Even not being as strong as the enemy normally is, having a Malboro as the second boss of the game is extremely rude. There’s, like, one or two instances in the series of those guys not being a total pain to deal with.
1 Like
I’m pretty sure I had played a regular Final Fantasy with a Malboro in it by the time I played this game as a kid and let me tell you, this boss was SO HARD as a small Zodi because of that mental image of “a Malboro will just ruin your entire day”.
Onwards, the caravan rolls.
[URL=“https://www.youtube.com/watch?v=WhS9dTfi0iA”]Zodi Plays: Final Fantasy Crystal Chronicles [3] A Dark Mine[/URL]
Video Length: 35:08
Starting us off today, we make our lovely Lilty caravaner so we can learn a bit more about how those little onion heads work. The Lilty race is the strongest physically, wielding massive glaives and bouncing the chalice on their head because their arms are too stubby to hold it up above them which is hilarious and ridiculous. The starting glaive they have has the same kinda focus attack the Yuke’s do, a jump attack, but it shields them from harm during it. The Lilty defend command is pretty bad, holding up their stick to defend. I think it still makes them take chip damage, and unlike the Clavat guard we’ll see next time, doesn’t block status effects.
With that out of the way, it’s time to visit the first town in the game! The first that isn’t Malta, at any rate. Town’s are interesting in that they change over the course of years, some stores not being available, some moving around, some changing prices and stuff. If I had infinite time I’d do all my shopping and smithing at Malta, but I don’t so let’s stick with what we’ve got here. We talk to some of the townsfolk, learning of their various plights. One has a womanizer grandpa and it sucks, one feels bad about her husband being dumb, one is a child who’s Mom left them to go on “vacation” after giving her Dad “something called a divorce” which I just…I just cannot handle this because the logistics of it means she either just left the barrier, crystal chalice or not, or she’s literally just sulking at the edge of town hoping no one notices her. We also get some word of people being forgetful on their travels, which I mean that’s fair. Who wants to remember the horrible death fog?
Mechanically, we sell basically all the trash I picked up along our adventures, using the combined gil to buy the Warrior’s Weapon scroll plus the Alloy needed to make it, and then proceed to make it, getting us the dual shooter. A very powerful racket that is going to give amazing dividends once we actually get to put it into use. Sadly, our old Racket must just be crumbled up into dust because you can’t sell old equipment in this game but they still take up inventory slots. How annoying.
With our business in Marr’s Pass done, we make our way towards our final destination for the year. The Mines of Cathuriges. This is effectively our “final dungeon” for our first year, and it shows. It’s a fairly winding mine system with huge rooms with multiple paths that don’t lead anywhere and some pretty violent monsters to contend with. The main force we’ll be fighting are Orcs, which are fairly rare in Final Fantasy. These green jerks run around wielding weapons like a battle axe, or a hand axe, or a magic stick, but they’re all just Orcs to me, and they all die in one Focus Attack now that we have our Warrior’s Weapon. Overall not that threatening, and in fact pretty hard to aggro. The second enemy we face are Bombs, who can Fire, Meteor, and when slain explode with a fairly weak explosion that a sets you on fire. Dangerous if you encountered a large group of enemies with a Bomb for support, but overall not that big a deal. Finally, we have the Ogre, a huge monster wielding giant smashy tools. It does a ton of damage, and takes a lot of damage, but given our increased Focus Attack charge speed we’re able to tear it down rather quickly. All in all the enemies are interesting here in that, they are all fairly threatening, but would be far more so if the encounters kinda put them together. It’s weird because this dungeon feels…a little empty, like they have more to show us but just aren’t here. Maybe it’s because it’s still early game and they want to ease it in on us.
The dungeon itself features a main gimmick that we follow for the first 2/3rds of it, babysitting a mine cart that’ll bust it’s way through barriers that are in our path. It’s not super complicated, but I manage to mess it up at least once because I genuinely forgot this cart even existed. I’ve played this game before, sure, but damn if I remember anything past like, a handful of dungeons. At the end of this one, we face the mighty Orc King, a massive red orc with a sceptor axe type thing and a hammer. He is surprisingly fast for his size and armament, quickly casting Flare spells and bashing us with a mighty mallet. He’s apparently weak to fire but given the power of our Focus Attack (and my desire to just keep Haste on to out move him) means I didn’t actually weak if that’s true. Orcs can come in to help him but they’re really more of a distraction. Once he’s almost dead the Orc King starts casting a self destruct spell, and while you can kill him during this there’s no benefit or reward for doing so, beyond not taking a large amount of damage that could kill you if you’re not careful. With a mighty explosion the Orc King dies, freeing the way towards the tree. We collect our final drop of Myrrh, and head home.
At Malta, we celebrate. We perform the ritual to give the three drops of Myrrh to the crystal, recharging it and protecting us for another year. We sing and dance, as the memories of our adventure pass us by in diary form along the screen, a feature I completely forgot and super appreciate. We laugh and sing, because we know for another year, we are protected. Time marches onward. And though our journey has ended for the year…this is just the beginning of what will be a truly fateful crystal caravan. I hope you all enjoyed, I’ll see you guys next time…for year two.
It’s time. Thus begins year two.
[B][URL=“https://www.youtube.com/watch?v=EBQTgFrB9zY”]Zodi Plays: Final Fantasy Crystal Chronicles [4] A Mighty Wall[/URL][/B]
[B]Video Length: 27:08[/B]
In this episode, we begin Year 2. So, let’s discuss the whole yearly cycle thing. Every year, the miasma streams change element, locking off some areas and making some areas more easily accessible. It’s pretty neat, though definitely annoying after a fashion. After beating a dungeon, it spends two years in a recovery period. You can still grind in it for artifacts, but you cannot get Myrrh from it. After those two years are up, the dungeon is back in working order…and also has upgraded. Each dungeon has two tiers of upgrade it can get to, and each upgrade changes the enemies inside and in some areas, the layout. The dungeon also gives better loot as well. Additionally, the year changing means all the events you can run into have increased. After all, everyone is changing along the years with you. It’s strange to say it, but despite being a desolate wasteland of miasma, this is a very well executed living world. It feels like the world kind of exists. Every year we also receive a bit more information about the lore of the world from Roland, in this case…if you can’t get enough Myrrh, please return. There was once a man who tried to rid the world of Miasma. We don’t know what happened but miasma exists and his town doesn’t so…yeah.
And so we set off, after preparing (and showing off the power of Clavats, aka: a shield) and we immediately run into the Marr’s Pass caravan! They’ve been attacked by the Black Knight…and instead of actually fighting with skill and precision as his legend says, he just kinda flailed at them wildly screaming about nonsense. He still WON their fight, but that’s a far better outcome than I expected. We also encounter Bal Dat, of the Striped Bandits. Called as such because they’re secretly bandits and they’re not so secretly wearing striped outfits. Unfortunately for him, the old man they work with failed to actually steal from us. Make no mistake, they will in the future steal our stuff, but for now this is just an introduction to these weirdos. With all those events out of the way, it’s time to head to our first dungeon of the year, one that just popped up over said year!
Say hello to then Goblin Wall. It is, shockingly, full of goblins. Including wizard goblins! There’s also Flans, that shoot a paralytic spit out, and Electric Jellyfish that cannot be touched to being electrified. We also have the simple, humble bat, which takes far more hits to kill than anything else in this dungeon, showing why you want beyond all else to use Gravity on fliers. Another thing this dungeon has a lot of is treasure! It’s gigantic, has many enemies, and all are prone to dropping nice loot. We don’t really pick up anything super good (though on my grinding run after this I DO pick up something useful) but we get a LOT of it, so we’ll at least be making a lot of money here. The boss of the Wall is then Goblin King, a wizard goblin of untold power! He’s also pretty smart, setting up a barricade we need to get through first before actually fighting him. The fight itself is pretty simple, the King casting -Ga level spells, Slow, and Bio to try and kill us, and occasionally bopping us with his staff or teleporting away to stop us from hitting him. He never does the latter in this fight for some reason.
Unfortunately for the Goblin King, his weak defenses are his down fall. We dispatch the king and send the goblins running, and gain access to the tree in his bed room. Another drop of Myrrh collected, one third of our adventure this year complete. What else could await us? Find out next time. Hope you all enjoyed.
1 Like
Onwards, to glory and Myrrh!
[B][URL=“https://www.youtube.com/watch?v=3GnaQfzEbDs”]Zodi Plays: Final Fantasy Crystal Chronicles [5] A Brutal Home Invasion[/URL][/B]
[B]Video Length: 28:51[/B]
Starting us off today is the fact that uh…no Myrrh is available in this or the next over area on the map, so we’ve got a lot of travel to do! I cut through mooost of it, and in the future will probably remove most of the map travel entirely, I’m just curious on what all your opinions on it are. So please make sure to comment on that. At any rate, during our travels we bemoan the fact that the blacksmiths at home are aren’t yet upgraded enough to work Master weapons and Mythril armour, meaning we’re gonna have some degree of item bloat just kinda floating around in our inventory for awhile as I do my best to hold onto all these materials and blueprints. Aside from that nothing actually HAPPENS during our ride across the world. It’s been a pretty uneventful leg in our journey. And so we move on, past the Iron Mine Downs to the Vale of Alfitaria, the homeland of the Lilty race. We make sure to make a quick stop at Alfitaria proper, taking in the sights, looking at all the stores but not buying anything because we’re surprisingly broke, finding a moogle friend, and finding an NPC who is apparently Sol Racht’s wife. So that’s cool. But our time here is short, for we have a dungeon to conquer, and so we head off to Moschet Manor.
Moschet Manor is one of the more interesting dungeons in the game, both in flavor and mechanics. It’s not the best dungeon, layout wise it’s one large hub with seven rooms branching off of it, each locked by a slooowly rotating switch that only allows you to open it when the switch shows the symbol of your race. There is absolutely no danger to waiting for the switch so it’s just tedious, but the idea of us invading this large mansion to loot it for goodies is really cool. It also speaks to the point of…we saw the Orcs and Goblins be organized, but we figured those guys were kinda lesser life forms since they’re monsters, they don’t talk and don’t try to discuss things with us. But Jack, the Gigas lord of this manor and his wife Maggie the Lamia, are both clearly in control of their senses (if Jack has anger issues) and probably could of been persuaded into letting us just go and get their Myrrh and be off. Instead, we’ve decided to murderer all ten Tonberry Chefs in the place to entice Jack out so we can find the tree that way. How rude.
The main enemy of the dungeon is the Tonberry Chef. Unlike Tonberries in regular Final Fantasy, these guys aren’t capable of using any vengeful, monster-killer hater moves to one shot you into oblivion. Being a chef is stressful enough for them to let out all their anger during that, I imagine. So instead all these guys do is stab. To be fair it IS a lot of damage, and apparently they can cast slow to make it harder to escape their knife, but really given their speed they’re barely even a threat. In contrast to that, the other enemies in this area are REAL dangerous. There are Coeurls, tentacle cats that can cast all the elemental damage spells, and unless my eyes are mistaken in this video, can do spell fusion with each other if they’re smart and lucky enough timing wise! We also have to contend with gargoyles, buff stone monsters that need to be knocked out of the sky using gravity, and take quite a beating even after they’ve been dropped too. They have a physical swipe and also spit out elemental blasts. There’s also a random gremlin but it’s as dangerous as the ones in Mushroom forest. Which is to say, “surprisingly” because it has Tonberries near it so if it hits you you might get comboed. Also, while I say healing is not available in this dungeon, I am in fact wrong. There are two treasure chests in the south west corner of the hub that I just DID NOT see, because my screen is too dark. So in the future I’m going to…change that, definitely, because that would of made a lot of things a lot easier here.
With all the chefs slain, Jack Moschet finally takes note of the fact that dinner isn’t happening any time soon. In his rage he attacks us, and once we bop him Maggie comes out to assist her husband in expelling the jerk Selkie that snuck into their home, murdered their staff, killed their pets, and raided their treasure chests (me). Maggie can smack at you with her fans for some weak damage, but her support spells are far more dangerous. She can fully heal Jack with her love, and she can cast Slowga to make it harder for you to avoid Jack’s attacks. Given Jack is surprisingly fast, this is really dangerous. More dangerous, once she gets to low health she’ll start trying to cast STOP instead of Slowga, which will leave you utterly vulnerable for a few seconds, potentially spelling your doom. Once you hit her enough she’ll go hide in a corner and cry, though. Jack in the meanwhile is pretty brutal, attacking with powerful punches, a ground pound that covers a fairly wide area around him, and ice breath that’ll freeze you in place if it hits (though if you have a Water element on your chalice you’ll be fine). Once you take out Jack the fight is over, the couple running from their home. Likely to call the monster police on us. We get our Myrrh, and muse about how perhaps we should of knocked.
And that’s our video today. See you guys next time for the end of Year Two, and for another of the coolest dungeons in the game from a pure flavor standpoint. And also, let’s say, some fun cables.
1 Like
It’s time to get in.
[B][URL=“https://www.youtube.com/watch?v=iTbmPF59aGU”]Zodi Plays: Final Fantasy Crystal Chronicles [6] A Peaceful Village[/URL][/B]
[B]Video Length: 36:03[/B]
Starting us off today, we’re actually NOT going straight to the dungeon. For you see, I have obtained, finally, the GBA to Gamecube link cable! So now I can make use of that mechanic in single player, as well as show off the minigames in multiplayer! In order to get this footage, I needed to set up my Gamecube, hook the GBA to Gamecube cable to the Game Boy Player attachment, connect the Gamecube side of the cord to the Wii, plug the Wii into the TV so I could actually play the game proper for navigation purposes, then hook the Gamecube (serving as the GBA) to the capture card to then connect to my computer and the TV so I could record it. Suffice to say, my room is already a tangle of cords but this is getting ridiculous. But, I can now show off the GBA screen, and I will do so here, now!
In single player, the GBA is connected to Slot 2, and serves as a simple radar. It tells you what the bonus objective is, and shows you a simple map layout of the dungeon you’re in, localized to your area. However, if you PAINT your Moogle, the map changes form. If you paint your Moogle red, you get a monster radar. Given this also removes the layout map entirely, this isn’t really all that good an option since it’s not REALLY that useful to know the location of enemies when you can’t really tell where they are in the world in relation to you. And really once you’re close enough for the radar to pick them up, you know they’re there. If you paint your Moogle blue, you get the Treasure Radar. Has some flaws similar to the Monster Radar, but is more useful since there are cases (cough Moschet manor has cure and life I just missed then chests they’re in the bottom left and right corners) where say, your screen brightness makes it hard to see treasure chests. My favorite however, is if you paint your Moogle green. You get the Monster Data screen! It shows you the name of the monster, plus it’s HP. The HP is less important since health is super abstract in this game, but it also shows you any elemental weaknesses or defenses they have, as well as if they are Flying or not, which would honestly be self evident but hey, it coould help. It also shows what loot item they drop, which…I can see being useful in Multiplayer mode, where radar is determined by controller port slot, letting you slip in to take a specific drop from an enemy you really want. Overall, given the GBA’s screen is as black as Canada in winter none of the radars are all THAT useful, especially in single player when you’re holding the Gamecube controller to play instead of the GBA controller.
In Multiplayer, the same radar stuff exists except since you must be played 1 you’re stuck with the Map radar when playing solo multiplayer, which is a thing you can do. However, if you’re doing this, you can go to any Moogle who’s given you a stamp that you have the full set of to play a minigame. Which is to say, you play Blazin’ Caravans. Blazin’ Caravans is a racing gamae where there are eight caravans aside from you but as far as I can tell only three of them are actually designed to be difficult opponents. You hold A to drive faster, press B to slow down, steer with the D Pad and fire off Magicite you pick up with the L or R button. If you touch food your character in FFCC likes, you get a speed boost, if they don’t like it it’s a speed down, and if it’s middle of the road…you get a dinging sound that doesn’t mean anything. To put it bluntly, Blazin’ Caravans is one of the worst things I’ve ever played. It’s worse than the GBA Mario Kart game, and that’s PRETTY BAD. The music has kind of grown on me by this point, but it’s still got this clear bad touch to it. The animations and sprite work are…passable, but imagining this on an actual GBA screen instead of the Gamecube’s Gameboy Player is giving me shivers. Mechanically, you pick the D class cart so you have good handling and then you win unless you understeer and end up in the grass for roughly a minute in which case all the other caravans pass you and then you lose. Or, god forbid, you’re using the Gameboy Player and accidently hit X or Y, changing which Caravan you’re looking at FOR NO REASON AT ALL, making you drive into a wall for the full race. And your reward, even if you win? Big ole goose egg. Nothin’. You don’t get anything but the opportunity to play more of it. I would not recommend it. I find the fact that Blazin’ Caravans is so immediately bad fascinating, because not a lot of people played FFCC, and an even smaller number of those people have ever seen seen this, let alone played it. So this is some rare stuff on screen right now. But it’s SO BAD, so it’s like…yeah, I got to show off this fairly rare thing. Too bad it sucks!
Anyway, back to the episode proper. We head off to Alfitaria to sell some stuff (meeting the Alfitaria caravan in the process, gaining what is one oef the simplest, weirdest events in the game) and then head off to our next destination. I’m sure you spotted it last time, there’s a village in the top right hand corner of this part of the hub world. It’s called Tida! Let’s go give em a visit. Except when we arrive…things are not quite what they seem. Tida is a necropolis, a dead village. A village who’s Caravan never returned with Myrrh. The people stayed, till the very end. None tried to leave for the distant Alfitaria in hopes of somehow surviving. They all remained, as the crystal slowly shrunk down it’s radius as it died. This is why Roland said we must return. This blighted wasteland of death and decay. The game doesn’t force you to go here last on Year 2, you can in fact avoid it for the most part. But it felt important to the themes and feelings of the game to do it here and now, in the end of Year 2. It goes without saying that, if we had kept the default town name, this village would be one upside down letter away from being identical to ours…and really, that’s just it isn’t it? Every village we’ve seen in the game. Malta nee Tipa, Marr’s Pass, Alfitaria, Sheela (though we’ve only heard of it), they all have a crystal, all have a Caravan. And every single one can end up a dead zone of monsters. It’s honestly scary in the real way, crawling up your back. I love this place, and I also hate it.
Enemy wise, we’ve got a few Gremlins again, plus Carrion Worms, far larger versions of the giant worms from the Mushroom Forest. Carrion Worm’s can cast thunder magic, and can spew out an AOE poison attack, which is pretty dangerous if you don’t get clear or cure soon, which we thankfully do. There’s also a new type of plant enemy, which I misidentify as a Hell Plant. If you pay attention you’ll see one spit out a bit of poison, which shows they’re actually just a reskinned enemy. I’mma call them Carrion Plants because all my sources say it’s the same enemy even though it’s blatantly not. There’s also Bomb’s to contend with, and they’re used a bit more effectively here since there are other caster enemies, and some bulkier boys to serve as interesting encounters. Speaking of, there’s Skeleton Soldiers and Skeleton Mages here as well, and they’re fairly basic for what they are. Bop em in the face to beat em, try not to get stabbed or styled on by magic.
The dungeon itself starts out simple, but swiftly develops into this fairly elaborate maze of sticky web plants that a single Fira (or if you’re bad at aiming like me, two Fira’s) can permanently remove. It’s honestly kind of annoying a mechanic, but it does give the place a more oppressive feel, which I feel works to a degree. This is one instance where I’d of liked to be able to actually pay attention to the Treasure Radar, I had it set up for this dungeon and I missed a treasure chest. Ah well. Finally, after pushing our way through the annoying plants, we find ourselves at the boss of this dungeon, Armstrong.
Armstrong is a fascinating boss. An animated house, covered in dark pustules and nasty mushrooms. It scuttled around on it’s foundation quickly, zipping too and fro. It’s attacks are fairly brutal, an AOE slow mist it shakes out, a poison breath attack, shooting cactus like needles out at you, swinging with it’s massive fence arm, and of course using that chimney to fire a cannonball at us for massive damage. On top of the attacks and the speed, Armstrong is fairly tanky. Thankfully, he is weak to fire magic, so a quick cast of Fira will set him on fire, halving his defenses so I can focus attack him down. With this strategy we’re easily able to dispatch Armstrong, and gain our final drop of Myrrh for the year. The only big of greenery in this area, a glowing tree of translucent blue. A reminder of what they could not achieve. We Myrrh and new artifact in hand, we return home for the ritual and the celebration. Another year put to rest. Another year out in the world. Three more dungeons drained for two years, meaning we’ll have to go even further beyond to get the Myrrh. I wonder what we’ll encounter on our adventures. All I know is that we won’t become like Tida.
I hope you all enjoyed, I’ll see you all next time.
And so we begin year 3
[B][URL=“https://www.youtube.com/watch?v=7oUWlkSl_wI”]Zodi Plays: Final Fantasy Crystal Chronicles [7] A Serene Sluice[/URL][/B]
[B]
Video Length: 31:57[/B]
Today’s episode is quite an eventful one! After preparing in Malta and leaving home (learning about an apparently mysterious element that can control them all) we encounter a TON of caravan events. We meet the Striped Bandits again, questioning them about their willingness to murder and then running over their Moogle when they try to rob us. We see the Marr’s Caravan at it’s best, being given random weapons and crafting items because we’re nearby, and also at it’s worse as it literally tries to murder a man for telling make believe stories. The man in question is Gurdy, and he tells us of how cactis don’t like getting hit by lightning. Good to know. We also meet the last two caravans of the world, the Selkie caravan from Luam or something I don’t know I’ve never seen it, and the caravan from Sheela where all the Yukes live. The Selkie caravan just kinda encourage us to be cool, while the Yuke charge us 10 gil to hear some in universe information about monsters, which is pretty cool. Also, we discover that the princess of Alfitoria is missing! That’s kind of a big deal so uh…we’ll keep an eye out for her just in case.
After a veritable smorgasbord of events, it’s time to…you know, actually do the new dungeon. Say hello to the Veo Lu Sluice! A pretty large area, a bunch of ringed pathways around a bunch of lake like things that ensure that the Jegon River is nice and full of water. It’s pretty stylish and cool, though I wonder how they constructed it. Given Yuke’s are responsible for it’s creation, that explains why it looks kind of “natural” I guess, is that makes sense. Regardless, it’s a pretty cool dungeon. It’s infested with lizardmen, generic melee enemies (with a thunder wizard variant) who are quite annoying given our newest weapon has a different, non ranged Focus Attack. They’ve got Gigan Toad’s with them, massive lumbering frogs that can lash out with their tongue, or cast ice magic. And of course we have the gryphons, massive birds that have a variety of strong physical attacks, and can shoot out a gust of wind. The weakest enemy here is the Water Flan, a jelly that can headbutt and do a slow breath attack. All in all, the enemies that are here are pretty strong, but nothing we can’t handle. Artifact wise we don’t get much, but we DO pick up a Blizzard Ring. Magicite Rings like this allow us to use Magic whenever, and it doesn’t even take up an inventory slot. They’re pretty good!
After fighting our way through the Sluice, solving some interesting timing based puzzles, we find ourselves at the boss. It’s a shame the Myrrh tree sprouted up so close to the Golem guarding the Sluice, because now we’ve got to destroy it! It doesn’t seem to like us, either because of Mog or because of our crystal chalice (probably the later) and it goes into a super battle mode. And what a battle mode it is, Golem is a pretty dangerous boss! A powerful right hook, rocket fists (which are thankfully easy to avoid), a slow gas like every other boss, a laser beam that freezes you solid in addition to causing damage, and an AOE death laser that sets everything on fire with an explosion. This is a pretty hectic boss fight, and the two Water Flan additions aren’t helping matters. But, we’re able to push our way through, beating the Golem to death with our fancy stick that makes giant explosions when we touch it to things, and we get our first drop of Myrrh this year. Two remain.
I hope you all enjoyed, I’ll see you guys next time. Be sure to take in the sights of the Sluice before you go.
This game’s soundtrack is really good, but I think Veo Lu Sluice has my favorite track of all. It’s nice to hear it again!
(By the way, the Drill being a defense artifact is a reference to a glitch in FF6. It’s normally an attack item, but if you tricked the game into letting you equip it as a helmet, it gave you max defenses.)
That’s fascinating, thanks! Never knew that.
A wild video appears! What do? Watch.
[B][URL=“https://www.youtube.com/watch?v=hRSHY4Y7WgY”]Zodi Plays: Final Fantasy Crystal Chronicles [8] A Foreboding Court[/URL][/B]
[B]Video Length: 37:23[/B]
Starting us off this video, we visit Shella, the ancient mysterious Yuke village. You can only enter if you pay them a Mark of Shella, though they sell those inside the city and they’re easy enough to find in the Sluice. Within the confines of the honestly rather beautiful village we find a bunch of Yukes, and get a little more insight into how these weirdos work. There really isn’t much TOO Shella, but important details include the fact that a lot of people here tend to forget things, and there’s a Selkie wizard scientist trying to find a way to create crystal-less travel through the Miasma! That’s pretty exciting, I wonder how he’ll do. After Shella we return to the Jegon River, inadvertently finding a mysterious Selkie woman, and also finding that Knocfelna, the royal guard we talked to last time, hunting after her with his gigantic dog. Nothing that’s really our business, so we take the Jegon Ferry off to the next hub area of the game, the Plains of Fum! In which we find the farming village The Fields of Fum, irrigated by the Jegon and large enough to have three crystals keeping it going! That must be hectic. We explore the village, finding it quaint and nice, impulse buy a cow, and head off for our next destination.
In all honesty, I should of done the Daemon’s Court last, because in style and scope it feels like a “final dungeon” for lack of a better term. It’s only a single room large, but it is a massive fortress full of enemies. This is some of the hardest basic enemy encounters we’ll have in this game, with Giant Lizardmen that can stun us, Lizardmen that carry spears that can stun us, Lizard Wizards that can cast thunder magic which etc etc the point is this is a place were you’ll get stunlocked to death if you’re not careful and I almost do a few times! This place also has Killer Bee’s, which are not a big deal if you have Gravity but oops guess who forgot how to make Gravity it’s me. There’s also Wraiths, horrible ghosts that require you to cast Holy on them before they’re really able to be hurt. They have 20 hp and until you hit them with Holy they only take one damage from any damage source. It sucks. One of the Wraith’s have the Life stone you need to cast Holy on them! There’s also Coeurl’s about, serving as pets to the lizards.
This dungeon has three gimmicks to it. First off, there are catapults. Hit them and they’ll launch rocks once in the direction that they’re facing. They’re really hard to actually use properly, but props for them trying to make something fancy. Second is that there is a Bomb on a log bridge that we cannot cross, that we must cast magic at to kill the bomb on it, and it’s explosion causes the logs to be sent down river. This is apparently supposed to open up some areas in another dungeon, but a buddy of mine has done some testing and can’t actually see any difference. Which is actually kind of a problem this game has. Since it’s a relatively obscure game, not everything is fully documented about it! The third gimmick for this stage is that there are two yellow lizardmen throughout the fort, each holding a key to the boss’s chamber. It’s a neat little bit of gameplay that I kind of like.
Once we’ve unlocked the boss’s chamber, it’s time to fight! The leader of the Lizardmen appears, the Lizardman King! I actually really like his dinosaur-y style design, and his weapons are pretty cool. That pile bunker on his arm can be launched forward as a powerful thrust attack, though it’s easy to dodge. Less easy to dodge is his shield arm attack, which both protects him from damage and spews out a bunch of arrows. The King also has a small little wiggle spin attack if you’re too close to him, which does almost no damage, and is actually really easy to bait him into so uh actually this boss is super easy holy crap. The biggest threat here is the coeurl’s getting in the way, or the occasional Lizardmen soldier coming in to hit the switch that causes the buzzsaw trap to activate, and even then it’s just a minor issue. It can even hurt the boss and other adds too! So yeah overall this isn’t a hard boss at all.
With the lizards routed, we get our Myrrh from the tree they built this “court” around. Another drop for the bucket. Hope you all enjoyed, I’ll see you guys next time.
2 Likes
I’ve really been enjoying this LP so far! Thanks for doing a playthrough of this game. 
I’m glad you’re enjoying it!
1 Like
And so we end our third year. Let’s go.
[B][URL=“https://www.youtube.com/watch?v=lMNb4AbDHsg”]Zodi Plays: Final Fantasy Crystal Chronicles [9] A Windy Cave[/URL][/B]
[B]Video Length: 40:41[/B]
Starting off this episode, we have a brief run in with the whole “side quest” thing regarding Knocfelna and the mysterious obvious princess. Moving on, we enter the Selepation Cave, our next dungeon. A massive cave system, labyrinthine and confusing due to everything mostly looking the same. It’s just like if we revisited the Mines! Only far more brighter and far more blue. I cannot overstate how gigantic this area is, passageways stretching on for quite a long time. There’s a ton of enemies in this dungeon, and all of them are pretty powerful. We have the occasional Lizardman of course, plus their giant variants. We’ve got Killer Bee’s back, as well as the Electric Jellyfish. We have the Cockatrice, a horrible bird who’s name is gonna be censored on one of the forums I post this on (oops!) which can shoot petrifying blasts, can cast a slow spell, and has poison breath. A nice little bundle of status effects. We’ve also got the sehagin, fishmen that can spit water at you, hit your face, and cast ice spells. Then we have the Blazer Beetle, which has a variety of horrible deadly stabby moves, and finally the Gigas, which has frost breath and can do some dangerous punches. All in all, the enemy spread here is quite vast and all the foes you must face down are pretty dangerous in groups. I kinda like it. Gameplay wise the cave doesn’t have much going for it. There are two doors that you need to hit these crystal switches at the same time to open, and there are three elevators that can be used as a sort of short cut, sort of bridge to get some more loot. All in all this dungeon is more compelling for it’s combat than anything else.
So, let’s talk about the boss! The boss is the Cave Worm, a massive goopy looking face in a hard chitin like shell. As an immobile boss it has the “come closer” sucking move, it has a long range slow orb attack and can spray some kind of mud or poison as a breath attack. Those are it’s only ranged options, and they’re very weak. Up close it can swing it’s body back and forth, and after awhile do a brutal ground slam. These attacks will DESTROY you. They’re very powerful, and I am in constant risk of death throughout this entire fight as a result. REALLY feeling that lack of a ranged focus attack right now, hahaaah. The Cave Worm’s adds are Electric Jellyfish, but I can easily dispatch those since my blizzard ring means we’ve finally gotten three orbs of Blizzard! Blizzaga is surprisingly useful, if I do say so myself. Not against the boss though he resists ice. After a long and hard fight, we finally win, melting the Worm’s body to go. We get our final drop of Myrrh for the year, and can finally return home.
While we were getting the Myrrh though, I noted in video that the chalice and the worm’s shell had kind of similar feels to them, art wise, and I feel that’s a topic worth bringing up, because thinking on it…all of FFCC kinda had this great feel of looking like it’s trying to directly look like some of Yoshitaka Amano’s art. Who is Amano? Well, he’s the artist behind a lot of rather iconic Final Fantasy designs. Designs so elaborate that the in game sprites of the older games often didn’t even try to emulate them, going in completely opposite directions. He also does the logo for each game. I bring him up because, as said above, I feel like FFCC is the only game to try 100% to emulate his art style. I don’t know if he did work on this game, but the chalice and the Myrrh tree are things that he would definitely just draw, and they’ve put it into the game without changing a thing. His work [URL=“https://s-media-cache-ak0.pinimg.com/originals/1e/1e/41/1e1e4120b8e4265813266b7372945b3a.jpg”]always has this beautiful kind of look to it[/URL], ranging from [URL=“http://www.spoon-tamago.com/wp-content/uploads/2016/02/Yoshitaka-Amano-6.jpg”]strange curly armoured men/trees[/URL] to [URL=“https://antigonie.files.wordpress.com/2013/12/amano6.jpg”]fairly gender ambigious heroes[/URL] to [URL=“https://www.videogamesartwork.com/sites/default/files/images/image/1375263950/finalfantasyvi_scene_pinball_mandala_5_by_yoshitaka_amano.jpg”]landscapes that I genuinely cannot tell you what they are[/URL], even though I know the game they’re about intimately. His artwork is beautiful, and the designs in this game all feel like they’re trying their best to show off his style of art in a more “real” 3D sense. Look at the Lilty and Yuke races, especially in regards to the Lilty’s tufts of onion hair. They seem straight out of Amano’s art. The Chalice, too, has this fascinating design that so clearly looks like various Final Fantasy title logos, which is a shame since the logo for FFCC is the Myrrh Tree. Missed opportunity, that, though still good looking. In summery…art is good, and for some reason due to the art I’m now thinking the Chalice might have some connection to insects(?) like the Cave Worm, due to the patterning and art looking similar.
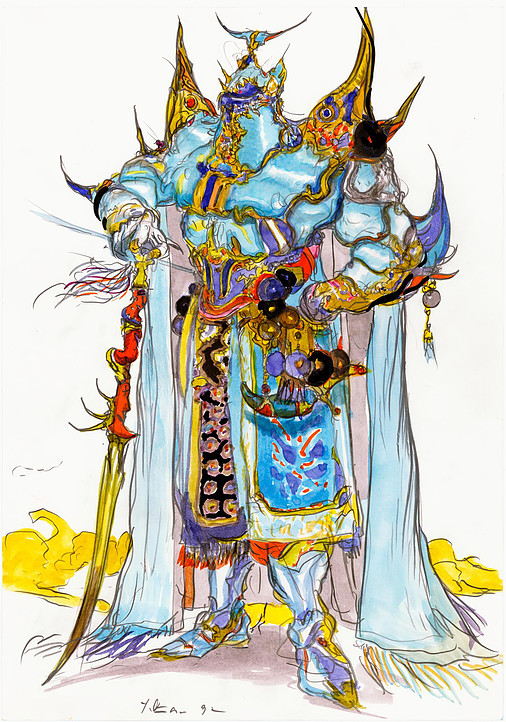
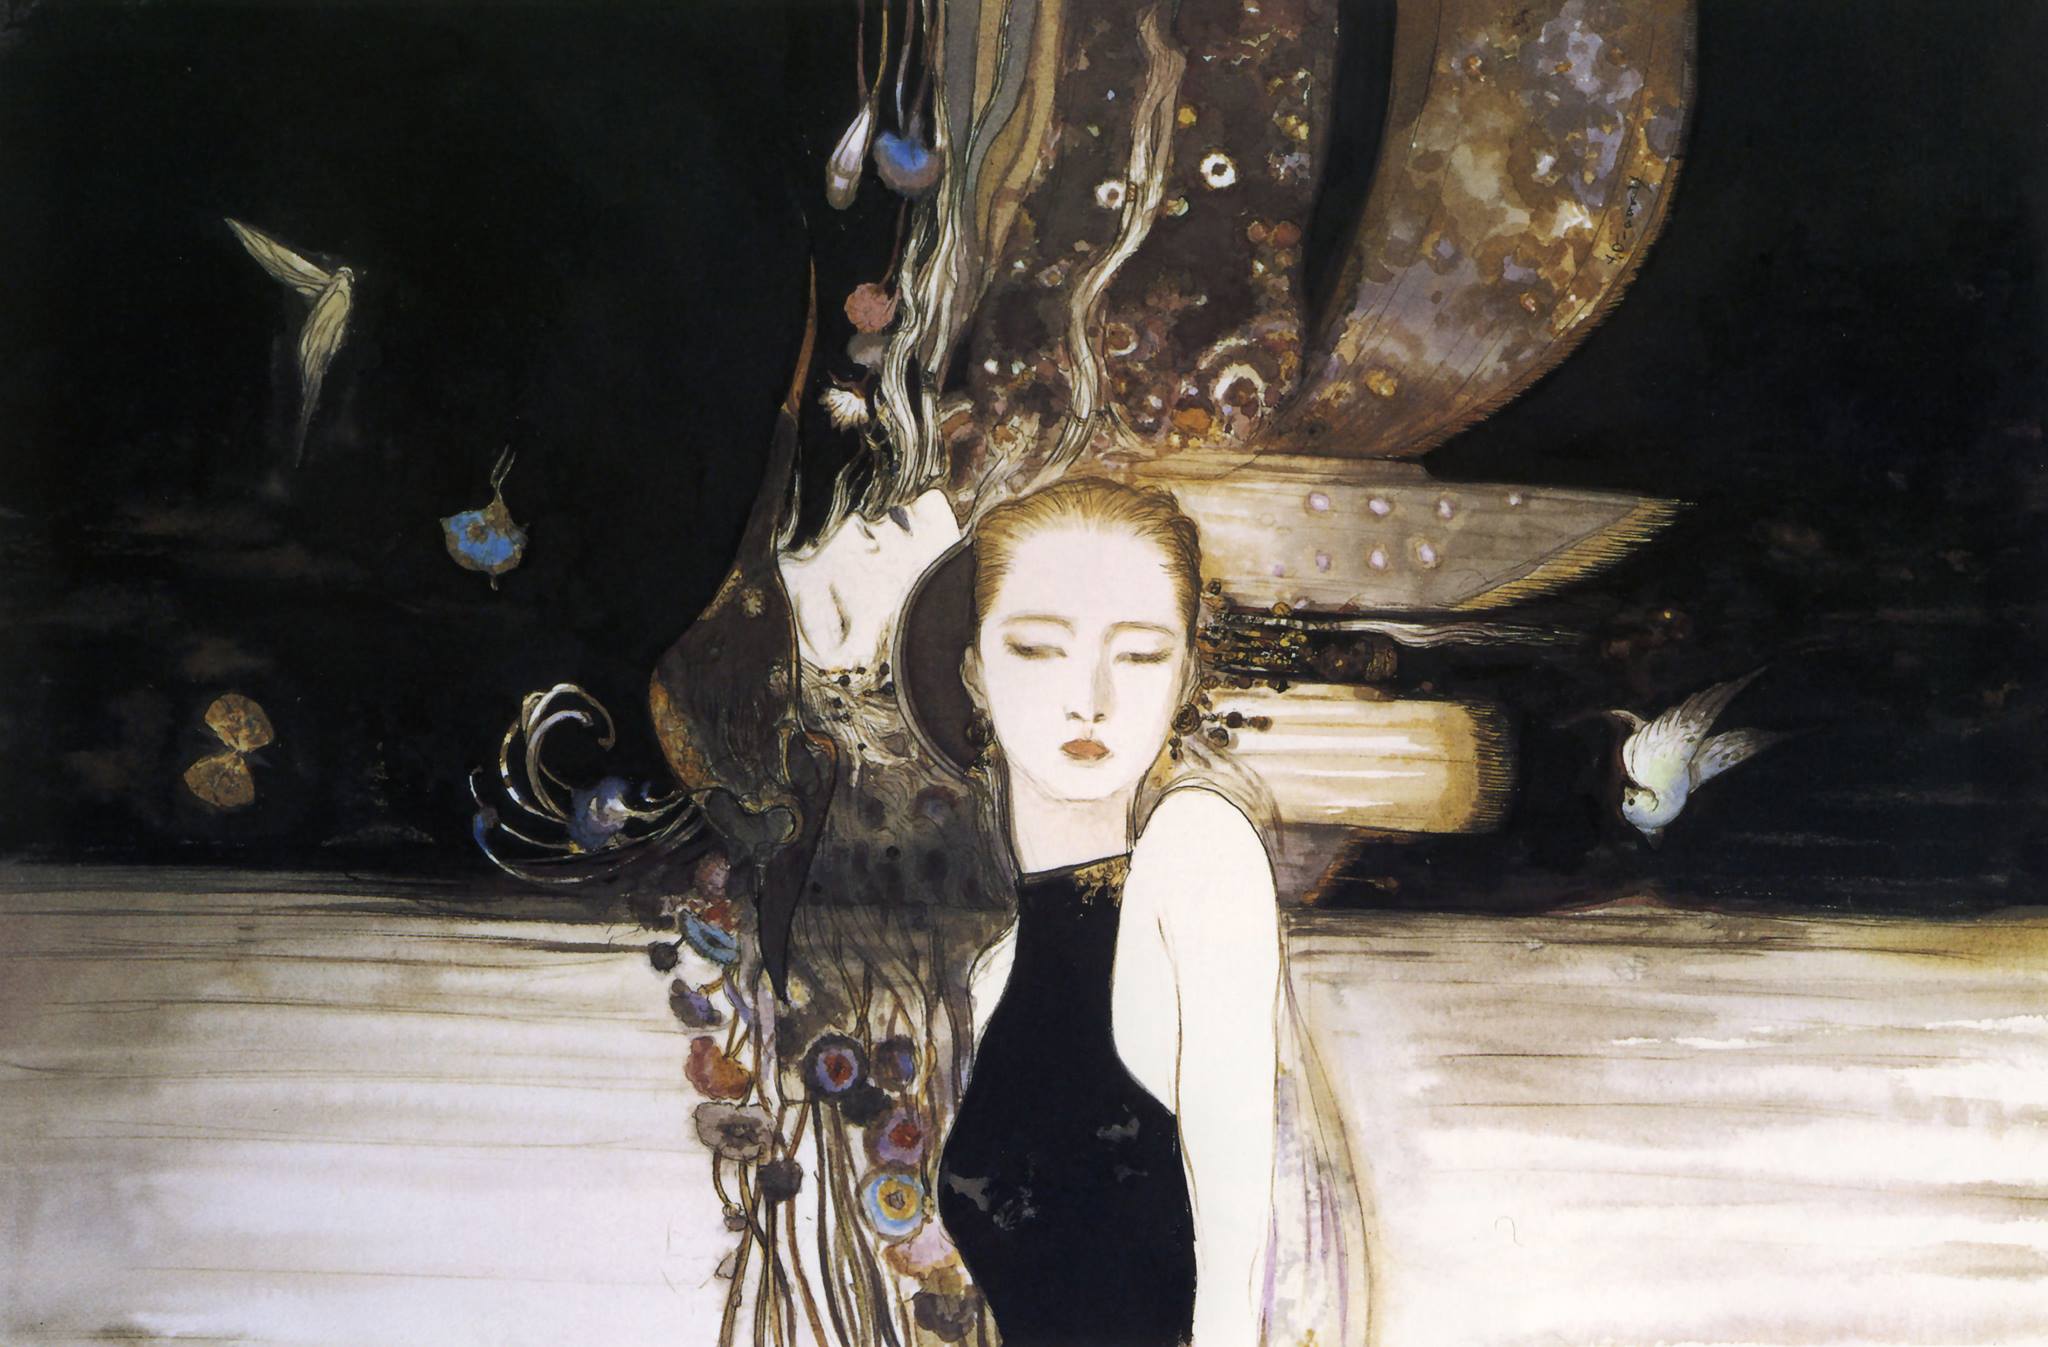
At any rate, my miniessay/rant/whatever about Amano’s art aside, that’s the end of the video, and the end of Year 3. I hope you all enjoyed, and I’ll see you all next time.
And so, year four begins.
[B][URL=“https://www.youtube.com/watch?v=UE5-0jntxy4”]Zodi Plays: Final Fantasy Crystal Chronicles [10] A Fiery Volcano[/URL][/B]
[B]Video Length: 32:25[/B]
As always, we start off the year talking to our family and getting rewarded. In this case, with bannock and a fire craft blue print. Nice. We also learn from Roland that it seems as though the sage (which may or been from this village!) hired a strong knight to go traveling, to find the secrets of this world. Fascinating stuff, but we put it from our mind and go off to hunt for more Myrrh. We make some Mythril Armour for us at Marr’s Pass, and have an encounter with Gurdy on our brief travel over…wherein he is being threatened with murder by the Fields of Fum caravan for lying about his quote unquote mail service. Uh oh. We save him, against our better judgement, and get rewarded with another verse of this poem he’s decided he’ll be telling us. Neat.
So, the first dungeon we’re tackling today is one I’ve never done. If you talk to the Ferryman and pay him 500 gil, he’ll take you to Mount Kilanda, a massive volcano. This is where we shall begin our hunting for the year. Mount Kilanda is a pretty big dungeon, but due to the “always go up” mentality of climbing a mountain, it’s not as maze like as the wind cave was. It’s also a lot more clear on where to go beyond that…though the gimmick of throwing water jugs into vents to open platforms is more than a little glitchy. The other thing this dungeon really has going for it is that it’s FULL of enemies, most of which are to distract you from stopping the goblins carrying those giant knives to the boss of the dungeon. Me being me, and having never done this dungeon before, I only was able to stop the one goblin.
Enemy wise, we’ve got quite a few to deal with, though only one is really NEW new. We’ve got Lava Ahriman, who are identical to regular Ahriman but cast fire instead of lightning. Lava Mu which…are ice weak Mu and I think that’s it. We have Coeurls back, alongside Ogres and Blazer Beetles… The only new enemy is the Lamia, a scaled down version of Maggie. They hit you with their fans and cast Stop . Also, I say “They” but there’s literally only the one Lamia in this entire dungeon. Huh. That aside, and as said above, this dungeon’s main threat is that it’s FULL of these enemies, so they can swarm you pretty effectively.
Of course, the real danger in this dungeon is the boss. A classic enemy through and through, it is the Iron Giant. A massive suit of armour wielding a likewise massive butcher’s knife of a sword, this is probably the deadliest foe we’ve fought yet. The goblins present it it’s swords, and the fight begins! It really only has three moves, but each move is incredibly power, capable of killing us in two hits for all but one of them. It has a simple sword swipe, which given it’s size means a large area in front of it gets hurt. It has a sword beam for ranged attacks. It can also smash the ground with it’s sword to cause a shock wave, which damages the sword. Once a sword is broken, it’ll start fist fighting, doing a shoulder ram or a REALLY huge ground pound attack with it’s fists, until finally deciding to get another sword…unless there are no swords left. In all honesty I find this guy easier to dodge when he HAS a sword, so…to each their own strategy wise. Goblin Wizards help support him, but are easily dispatched. And speaking of strategy, there are water pots around the arena that can be used to make massive steam vents to deal damage to the Iron Giant. They’re not really that useful, especially given how finicky the lava vents are.
With the Iron Giant slain, we get our drop of Myrrh from atop the volcano, a job well performed. We pick up a Fire Ring for our trouble, which will be useful later. As always, I hope you all enjoyed. I’ll see you guys next time.
It’s time to go even further beyond.
[B][URL=“https://www.youtube.com/watch?v=Je9kkPll08E”]Zodi Plays: Final Fantasy Crystal Chronicles [11] A Deadly Swamp[/URL][/B]
[B]Video Length: 44:05[/B]
Starting us off today, after a somewhat dramatic event, is a brief return to the Fields of Fum. Every so often an event is held there, and it just so happens that it is available now! It’s time for COW RACING! After that thrilling bit of media we then head off to our next destination, past an even further Miasma stream. Say hello to the Rebena Plains, home to our last two dungeons for the year. Our first destination, the swamp known as Conall Curach. Conall Curach can mean a lot of things. Conall Curach (usually Cernach) is a gaelic hero, part of the Ulster cycle, but that doesn’t really mesh with anything here except “I guess swamps are in celtic stuff too”. Curach is a type of irish boat, and if you look at some of the boats later in the stage they look like what a curach looks like. And as I write this I realize, this is a place that was tried to be settled by the Selkie, another vaguely gaelic routed word. Given Conall Cernach’s epithet means something like “Victorious” according to most linguistic scholars, it might actually be more intentional than I originally thought. This was to be the Selkie’s great victory. Given it’s a dungeon, you can see how well that worked out.
The Conall Curach is a vast dungeon spanning three areas of load zones. The first area is more open, the second far more constrained, and the third a nice mixture of the two. A deadly swamp oozing with Miasma, it’s full of pretty powerful enemies. We’ve got Snow Mu, which as far as I can tell are not different in any way beyond colouration. We have the Magic Plant, a regular ole flower capable of spitting orbs like normal, but also very adept at casting magical spells, having a seemingly halved casting time. Potentially very dangerous as a support enemy. We’ve got Grenades, otherwise known as Ice Bombs, which are…what you’d expect. Bombs but they cast blizzard and explode into Freeze instead of Burn. There’s also Thunder Bombs that do the same but with Stun. We’ve got regular ole Sahagin, as well as Stone Sahagin who are rather tanky, though a well placed Gravity can rip them down to being killed easily enough. Gigan-Toad’s and Flans are back, as well as DARK FLANS which must be hit with Holy to make damagable by more than one point a hit. We’ve also got Ghosts, who likewise need to be revealed with Holy, and who have a small AOE ice attack. Of course, the piece de resistance of this dungeon is the BEHEMOTH, a brutal beast with huge AOE attacks fueled by one of the three elements, a vicious gore attack, and a brutal claw swipe. These guys are DECIDEDLY dangerous, but thankfully are weak to Thunder and thus can be stunned with Thundara or higher. We even get to show off Thundaga this run!
Enemies aside, there isn’t much to really discuss in this dungeon. There’s no puzzles, beyond the puzzle that may not even exist in the sense that Daemon’s Court can send logs down here if you blow them up allegedly. It’s just a straight, if twisted, path to the end of the dungeon. Once there we meet our boss, the Dragon Zombie. For some reason you need Holy to reveal this boss too, even though it’s a ZOMBIE and not a ghost. Weird. The Dragon Zombie is one of if not the hardest boss in the entire game, with a single Stone Sahagin as it’s ad. The play area here is severely limited, and the dragon’s attacks are fairly wide spread. A laser breath attack, a lunge forward to bite at you (which puts the boss in a more feasible melee range for a brief period of time), a wing flap that causes a tornado to blow forward, and a wide spreading Bio Breath that poisons and does a ton of damage. The only real way to beat this boss is by jamming Holy spells into it. Once that’s finally been taken care of, the zombie re-dies and we get our drop of Myrrh. The single green tree in a field of dead and dying swamp land. Poignant.
Hope you all enjoyed, I’ll see you all next time…for the end of Year Four.
1 Like
Aw, Conall Curach… What a sad place. It might even be sadder than the village of Tida. It’s even the site of piece of lore that I’ve never forgotten ever since it first came out. I don’t think you can see it on your first visit, so I won’t say what it is, even behind spoiler tags.
Just watching this playthrough is bringing back all kinds of memories. What a good game this was.
If I end up missing it, because while this is basically blind I have an idea of what getting to the end entails…there might be a chance I miss it, so definitely mention it then.
Will do! It is optional, but I went back through the videos you’ve posted so far, and you haven’t missed it yet. I’ll keep an eye out in future videos, too.
Delay in post today due to accidently staying up until 4 playing Nier.
[B][URL=“https://www.youtube.com/watch?v=lZHZIhYLhlk”]Zodi Plays: Final Fantasy Crystal Chronciles [12] A Hallow Necropolis[/URL][/B]
[B]Video Length: 50:48[/B]
Starting us off this year, we head a little bit to the left of our destination to see it. The final Miasma Stream. Glowing and crackling with an unknown energy that I will likely dub Holy for simplicities sake. There’s nothing we can do here, so it’s best to wander off back to the dungeon and get it done. For today we’re doing Rebena Te Ra, the former capital of the world, now turned necropolis by age and miasma. It’s full of nasty creatures, devious puzzles, and one of the most frustrating single player things you can see: a puzzle designed for two players. Let’s detail the enemies first.
There are quite a handful of returning and semi-returning enemies here. Old friends include the Skeleton Warriors and Wizards, though they’ve gotten upgrades in terms of what they can do. The warriors can shield and have their own focus attack like thing, and the Wizard gets a level 2 version of Blizzard or Thunder. Gargoyles are back unchanged, though I feel like design wise they might look different? I cannot be sure. The Ghost is back, as is the Wraith to really send the point home that this is a dead place full of dead things. And while it’s actually completely different, the bat is back in the form of the Sonic Bat, which I never let do anything more than flutter around and the wiki is dead on information at this point! We’re a bit lacking on new enemies, but the enemies that ARE new are pretty cool. We have the Night Mare, a ghostly half-horse that can spew out elemental blasts and kick at you. Finally we have Cerberus, with a long ranged wind attack, fire breath, and probably some manner of ice and lightning attack too. Just a hunch.
Puzzle wise, Rebena Te Ra is the most loaded up with them. There’s key doors, switches we need to stand on, switches that require us to leave the safety of the chalice, switches that move the stage around, and more! Of primary note are the orb switches and blood sacrifice squares. The orb switches must be hit with a spell that matches the colour of the orb, and then struck with a physical attack. This is all well and good, and in the case of the white version can just be magiced in general. But the crux here comes from one singular puzzle that is the bane of many people’s existences. There is one puzzle where you must break and then hit two of the orb switches, within a time limit due to the shield and the orb switch itself respawning. This is a stupidly hard thing to do, involving either using Mog and having near perfect timing to get the switches free and hit the orb before they respawn, or using Haste (and or being a Yuke due to decreased casting time) to try and get the near frame perfect window to open the door these switches hold. Or, you can do what I did, a method that as far as I can tell has not been seen before (at least according to my scientist). Blizzaga, and the other -aga level spells, have a delay in when the spell actually “goes off”. So if you time it right, which is far easier than timing the other methods, you can cast -aga, cast the proper level 1 spell on the other switch, and then hit both with just a few seconds to spare. Our reward is mostly in how it affects our Bonus points at the end more than any material gain, but still!
The second noteworthy puzzle are the blood sacrifice switches, which I only really bring up because they’re a fascinating design choice. This game’s really only had two solutions to puzzles; put thing on thing, or hit thing with stick. This one involves having YOU get hit, which while it isn’t a dramatic change up in how the systems work, is at least unique. Of course they have an issue, in that the white glowing squares don’t “turn off” when they’ve accepted input like the other squares, being a little confusing in that regard, but nothing can be perfect and I can’t imagine how difficult this kind of thing is to program. Regardless, after the long and brutal fight across the ruined grounds of this city have concluded, we open up the Necropolis proper and go to meet our boss for today.
The boss for today is the Lich, a Yuke who’s bound her soul to a phylactery (probably the mirror in the boss room) and I must say I absolutely love this boss design. It looks cool, clearly evoking that sense of being a Lich while also still clearly being a former Yuke. I especially love how her skull has the face holes of her helmet. This of course raises a lot more questions about how Yuke work as a species, but still! If there was any race that could become Lich’s it would be the race that might just be living souls in armour that excell at magic. The Lich is a bit of a gimmick boss, not having much health by setting up two orb switches around the arena. You only have to hit each once with any spell to break them, but until you do she can’t be hurt, and she has an expanded spell list. The left side switch gives her Meteor, and it’s quick-casted to the degree that it might as well just be a “hit you from anywhere physical attack” though she doesn’t use it much. The right hand orb gives her a massive Chain Thunder spell that covers almost the whole arena and can hit multiple times, stunning for each hit. It’s brutal! Her basic spell she always has is Flare, which is actually super weak and easy to avoid. Since I, again, have a physical focus attack, hitting her is a little difficult even after I Holy her, but I realized that if I center in on her shadow it does for the most part work out fine.
With the Lich summarily sent back to whatever soul realm she put her soul into, we move on and collect our final bit of Myrrh for the year. We return home and have our celebration, as we prepare for the next year. This one is…going to be a doozy. I’ll see you guys then.
1 Like
It’s time for more of this!
[B][URL=“https://www.youtube.com/watch?v=VbWIgzsd7NY”]Zodi Plays: Final Fantasy Crystal Chronicles [13] An Enigmatic Desert[/URL][/B]
[B]Video Length: 36:31[/B]
And so begins Year Five. As we leave town, Roland basically outright tells us, even if he doesn’t realize it, that Gurdy is the sage from Malta who was hunting the Holy element. The poems make it PRETTY clear, and is meant to be your note to pay close attention to what he says. We also learn that the Jegon River has dried up, so we can’t access that chunk of the game…and while I’d love to go to Shella to figure out what’s wrong the layout of then Miasma streams means that we can’t go past Marr’s Pass. Well then. Luckily, the boatman has moved to Malta, so we’ve still at least got access to his boat. So let’s get a move on! Of course, we have events to encounter first…both of which are rather fascinating. We finally meet the Black Knight, and he’s…definitely not doing to well. Raging at an invisible creature that may not even be there, violently flailing about talking about how he’s definitely not going Hollow. I can’t tell if this is more or less funny due to Dark Souls being a thing. After leaving the crazed man to wander the roads alone, we come across Gurdy…selling bread to the Yuke caravan as a “modal of the world”. Complete with natural decay and death action! He swindles them out of 5000 gil and then gives us a lecture about how things aren’t always as they seem. Fascinating, and super rude.
Once we arrive at Port Malta, the boatman tells us we can sail off to Lynari Island, where the Selkie home city of Leude is located. I’ve always wanted to check out my ancestral home, so sure! I’ve never played into Year 5 by the way, so everything I see here will be completely new. And what we see in Leude is a bunch of well lived in nomads hanging out at the one oasis in this vast desert…who will steal gil from you every time you talk to them, as long as you’re a non-Selkie. What jerks! And there’s a jumping minigame that is absolutely AWFUL, taking 500 points to get even the most base reward, and FOUR THOUSAND to get an Orichalcum! The only thing I like about Leude is the art (the angel carvings are fascinating) and the emo Selkie talking about how their legends say they will one day return to the sea…and how he’s pretty sure this is just the other races hoping they’ll die. Jesus. After that, and some eaves dropping on the princess of the world, we leave the city and head to Lynari Desert, the final dungeon. Before the actual final dungeon, I mean.
Lynari Desert is…to put it mildly, kind of a hot mess. It’s a massive area with basically no defining landmarks sans a few scattered here or there, full of enemies that I think might respawn but I cannot be sure. And like, it’s all intentional because it’s this massive desert wasteland. It’s meant to be a place where you can get horribly lost. And let me tell you, I do get pretty dang lost here. But importantly, I do find some vital things. Specifically…I discover some standing rocks, and a prickly cactus, both with examine prompts. This must be where Gurdy’s poem leads to. Once I’m confident we have all the pieces of that…I think we’ll know where to go to get the Holy element! For now though, we must simply explore the desert. Eventually I realized that if you jump into one of the quicksand pits, you’ll find progress, and I do so, leading us to an area that actually has some clear idea of progression. let’s just talk about the enemies in this place now. The Scorpion is the most basic enemy here, able to poison with it’s tail and hurt with it’s claws. It’s design is fascinating, two giant tails growing out of two giant claws. We’ve got the Lamia returning, and later in the stage we find Sand Sahagin that may as well just be regular ones. We’ve got Zu, which are horrible flying death kite birds that spew elemental magic, and the nasty Chimera, with it’s fire breath, ice breath, and electro shock AOE attack. And of course, my good boy the Cactuar, an intentionally poorly animated Cactus that knows kung fu, lightning magic, and can spew a thousand needles at you (give or take a couple, since this does a flat thousand damage in regular FFs). All in all, a good set of enemies.
At the boss room, we find that he’s a little shy, and we must beat up his scorpion friends to get him out. After the scorpions comes Electro Scorpions, who are like regular ones but can stun you, and after them are Stone Scorpions, who are like regular Scorpions but take a thousand hits. Once they’re all dead, the boss appears! The Antlion, probably the worst boss in the game. He’s too massive for too small an arena, and too fast. The camera is weird in this fight too. The Antlion has four attacks, a petrifying breath that’s easy to dodge, a chomp attack with it’s mandibles which is fairly hard to dodge if you’re pushing to hard, an AOE smash with it’s claws which is deceptively hard to dodge and doesn’t actually physically affect you, sometimes concealing you’ve been hit in general, and once he gets low on health he can fire a charged up lightning beam, which is so easy to dodge it’s basically a non issue. I really don’t like this boss, something about it rubs me the wrong way and it’s WAY too beefy in terms of health. But once we hit it enough, it falls down and we have access to the first Myrrh tree of this year! And with that…it’s time for some groundwork.
So, I’ve now shown off every unique dungeon in the game. We still don’t yet know how to get the Holy Element, and Gurdy only pops up once per year. From this point onward, beyond showing off how you fix the Jegon River problem early and any memories we encounter, I don’t really have any more content to show you. So! Don’t expect a video Monday, work stuff has made that basically impossible. I’ll be putting up a Throwback Thursday video instead, if you can tolerate that. Instead, I’ll be working on…let’s say “the preconclusion” of FFCC. If everything goes well it’ll be up for next Friday, but that depends on a few things. So yeah, for now, you can bid farewell to FFCC. As for me, Monday is going to be “and then I recorded for 9 hours” day. Hoo boy. Hope you all enjoyed, I’ll see you guys next time.
3 Likes