I’m glad you’re enjoying it!
1 Like
And so we end our third year. Let’s go.
[B][URL=“https://www.youtube.com/watch?v=lMNb4AbDHsg”]Zodi Plays: Final Fantasy Crystal Chronicles [9] A Windy Cave[/URL][/B]
[B]Video Length: 40:41[/B]
Starting off this episode, we have a brief run in with the whole “side quest” thing regarding Knocfelna and the mysterious obvious princess. Moving on, we enter the Selepation Cave, our next dungeon. A massive cave system, labyrinthine and confusing due to everything mostly looking the same. It’s just like if we revisited the Mines! Only far more brighter and far more blue. I cannot overstate how gigantic this area is, passageways stretching on for quite a long time. There’s a ton of enemies in this dungeon, and all of them are pretty powerful. We have the occasional Lizardman of course, plus their giant variants. We’ve got Killer Bee’s back, as well as the Electric Jellyfish. We have the Cockatrice, a horrible bird who’s name is gonna be censored on one of the forums I post this on (oops!) which can shoot petrifying blasts, can cast a slow spell, and has poison breath. A nice little bundle of status effects. We’ve also got the sehagin, fishmen that can spit water at you, hit your face, and cast ice spells. Then we have the Blazer Beetle, which has a variety of horrible deadly stabby moves, and finally the Gigas, which has frost breath and can do some dangerous punches. All in all, the enemy spread here is quite vast and all the foes you must face down are pretty dangerous in groups. I kinda like it. Gameplay wise the cave doesn’t have much going for it. There are two doors that you need to hit these crystal switches at the same time to open, and there are three elevators that can be used as a sort of short cut, sort of bridge to get some more loot. All in all this dungeon is more compelling for it’s combat than anything else.
So, let’s talk about the boss! The boss is the Cave Worm, a massive goopy looking face in a hard chitin like shell. As an immobile boss it has the “come closer” sucking move, it has a long range slow orb attack and can spray some kind of mud or poison as a breath attack. Those are it’s only ranged options, and they’re very weak. Up close it can swing it’s body back and forth, and after awhile do a brutal ground slam. These attacks will DESTROY you. They’re very powerful, and I am in constant risk of death throughout this entire fight as a result. REALLY feeling that lack of a ranged focus attack right now, hahaaah. The Cave Worm’s adds are Electric Jellyfish, but I can easily dispatch those since my blizzard ring means we’ve finally gotten three orbs of Blizzard! Blizzaga is surprisingly useful, if I do say so myself. Not against the boss though he resists ice. After a long and hard fight, we finally win, melting the Worm’s body to go. We get our final drop of Myrrh for the year, and can finally return home.
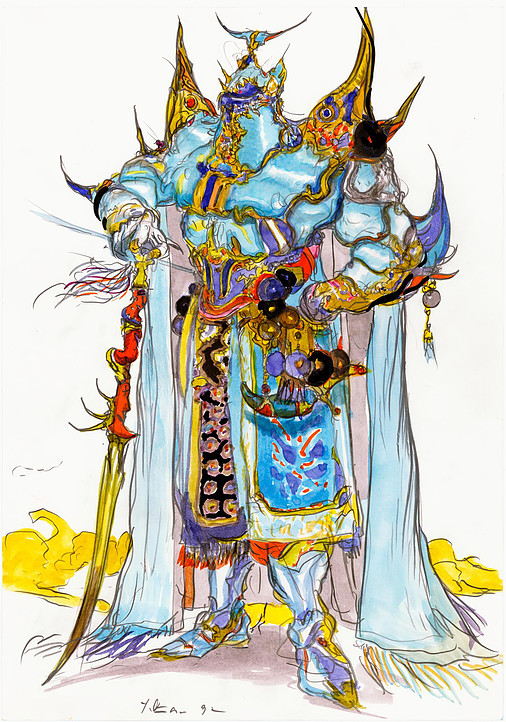
While we were getting the Myrrh though, I noted in video that the chalice and the worm’s shell had kind of similar feels to them, art wise, and I feel that’s a topic worth bringing up, because thinking on it…all of FFCC kinda had this great feel of looking like it’s trying to directly look like some of Yoshitaka Amano’s art. Who is Amano? Well, he’s the artist behind a lot of rather iconic Final Fantasy designs. Designs so elaborate that the in game sprites of the older games often didn’t even try to emulate them, going in completely opposite directions. He also does the logo for each game. I bring him up because, as said above, I feel like FFCC is the only game to try 100% to emulate his art style. I don’t know if he did work on this game, but the chalice and the Myrrh tree are things that he would definitely just draw, and they’ve put it into the game without changing a thing. His work [URL=“https://s-media-cache-ak0.pinimg.com/originals/1e/1e/41/1e1e4120b8e4265813266b7372945b3a.jpg”]always has this beautiful kind of look to it[/URL], ranging from [URL=“http://www.spoon-tamago.com/wp-content/uploads/2016/02/Yoshitaka-Amano-6.jpg”]strange curly armoured men/trees[/URL] to [URL=“https://antigonie.files.wordpress.com/2013/12/amano6.jpg”]fairly gender ambigious heroes[/URL] to [URL=“https://www.videogamesartwork.com/sites/default/files/images/image/1375263950/finalfantasyvi_scene_pinball_mandala_5_by_yoshitaka_amano.jpg”]landscapes that I genuinely cannot tell you what they are[/URL], even though I know the game they’re about intimately. His artwork is beautiful, and the designs in this game all feel like they’re trying their best to show off his style of art in a more “real” 3D sense. Look at the Lilty and Yuke races, especially in regards to the Lilty’s tufts of onion hair. They seem straight out of Amano’s art. The Chalice, too, has this fascinating design that so clearly looks like various Final Fantasy title logos, which is a shame since the logo for FFCC is the Myrrh Tree. Missed opportunity, that, though still good looking. In summery…art is good, and for some reason due to the art I’m now thinking the Chalice might have some connection to insects(?) like the Cave Worm, due to the patterning and art looking similar.
At any rate, my miniessay/rant/whatever about Amano’s art aside, that’s the end of the video, and the end of Year 3. I hope you all enjoyed, and I’ll see you all next time.
And so, year four begins.
[B][URL=“https://www.youtube.com/watch?v=UE5-0jntxy4”]Zodi Plays: Final Fantasy Crystal Chronicles [10] A Fiery Volcano[/URL][/B]
[B]Video Length: 32:25[/B]
As always, we start off the year talking to our family and getting rewarded. In this case, with bannock and a fire craft blue print. Nice. We also learn from Roland that it seems as though the sage (which may or been from this village!) hired a strong knight to go traveling, to find the secrets of this world. Fascinating stuff, but we put it from our mind and go off to hunt for more Myrrh. We make some Mythril Armour for us at Marr’s Pass, and have an encounter with Gurdy on our brief travel over…wherein he is being threatened with murder by the Fields of Fum caravan for lying about his quote unquote mail service. Uh oh. We save him, against our better judgement, and get rewarded with another verse of this poem he’s decided he’ll be telling us. Neat.
So, the first dungeon we’re tackling today is one I’ve never done. If you talk to the Ferryman and pay him 500 gil, he’ll take you to Mount Kilanda, a massive volcano. This is where we shall begin our hunting for the year. Mount Kilanda is a pretty big dungeon, but due to the “always go up” mentality of climbing a mountain, it’s not as maze like as the wind cave was. It’s also a lot more clear on where to go beyond that…though the gimmick of throwing water jugs into vents to open platforms is more than a little glitchy. The other thing this dungeon really has going for it is that it’s FULL of enemies, most of which are to distract you from stopping the goblins carrying those giant knives to the boss of the dungeon. Me being me, and having never done this dungeon before, I only was able to stop the one goblin.
Enemy wise, we’ve got quite a few to deal with, though only one is really NEW new. We’ve got Lava Ahriman, who are identical to regular Ahriman but cast fire instead of lightning. Lava Mu which…are ice weak Mu and I think that’s it. We have Coeurls back, alongside Ogres and Blazer Beetles… The only new enemy is the Lamia, a scaled down version of Maggie. They hit you with their fans and cast Stop . Also, I say “They” but there’s literally only the one Lamia in this entire dungeon. Huh. That aside, and as said above, this dungeon’s main threat is that it’s FULL of these enemies, so they can swarm you pretty effectively.
Of course, the real danger in this dungeon is the boss. A classic enemy through and through, it is the Iron Giant. A massive suit of armour wielding a likewise massive butcher’s knife of a sword, this is probably the deadliest foe we’ve fought yet. The goblins present it it’s swords, and the fight begins! It really only has three moves, but each move is incredibly power, capable of killing us in two hits for all but one of them. It has a simple sword swipe, which given it’s size means a large area in front of it gets hurt. It has a sword beam for ranged attacks. It can also smash the ground with it’s sword to cause a shock wave, which damages the sword. Once a sword is broken, it’ll start fist fighting, doing a shoulder ram or a REALLY huge ground pound attack with it’s fists, until finally deciding to get another sword…unless there are no swords left. In all honesty I find this guy easier to dodge when he HAS a sword, so…to each their own strategy wise. Goblin Wizards help support him, but are easily dispatched. And speaking of strategy, there are water pots around the arena that can be used to make massive steam vents to deal damage to the Iron Giant. They’re not really that useful, especially given how finicky the lava vents are.
With the Iron Giant slain, we get our drop of Myrrh from atop the volcano, a job well performed. We pick up a Fire Ring for our trouble, which will be useful later. As always, I hope you all enjoyed. I’ll see you guys next time.
It’s time to go even further beyond.
[B][URL=“https://www.youtube.com/watch?v=Je9kkPll08E”]Zodi Plays: Final Fantasy Crystal Chronicles [11] A Deadly Swamp[/URL][/B]
[B]Video Length: 44:05[/B]
Starting us off today, after a somewhat dramatic event, is a brief return to the Fields of Fum. Every so often an event is held there, and it just so happens that it is available now! It’s time for COW RACING! After that thrilling bit of media we then head off to our next destination, past an even further Miasma stream. Say hello to the Rebena Plains, home to our last two dungeons for the year. Our first destination, the swamp known as Conall Curach. Conall Curach can mean a lot of things. Conall Curach (usually Cernach) is a gaelic hero, part of the Ulster cycle, but that doesn’t really mesh with anything here except “I guess swamps are in celtic stuff too”. Curach is a type of irish boat, and if you look at some of the boats later in the stage they look like what a curach looks like. And as I write this I realize, this is a place that was tried to be settled by the Selkie, another vaguely gaelic routed word. Given Conall Cernach’s epithet means something like “Victorious” according to most linguistic scholars, it might actually be more intentional than I originally thought. This was to be the Selkie’s great victory. Given it’s a dungeon, you can see how well that worked out.
The Conall Curach is a vast dungeon spanning three areas of load zones. The first area is more open, the second far more constrained, and the third a nice mixture of the two. A deadly swamp oozing with Miasma, it’s full of pretty powerful enemies. We’ve got Snow Mu, which as far as I can tell are not different in any way beyond colouration. We have the Magic Plant, a regular ole flower capable of spitting orbs like normal, but also very adept at casting magical spells, having a seemingly halved casting time. Potentially very dangerous as a support enemy. We’ve got Grenades, otherwise known as Ice Bombs, which are…what you’d expect. Bombs but they cast blizzard and explode into Freeze instead of Burn. There’s also Thunder Bombs that do the same but with Stun. We’ve got regular ole Sahagin, as well as Stone Sahagin who are rather tanky, though a well placed Gravity can rip them down to being killed easily enough. Gigan-Toad’s and Flans are back, as well as DARK FLANS which must be hit with Holy to make damagable by more than one point a hit. We’ve also got Ghosts, who likewise need to be revealed with Holy, and who have a small AOE ice attack. Of course, the piece de resistance of this dungeon is the BEHEMOTH, a brutal beast with huge AOE attacks fueled by one of the three elements, a vicious gore attack, and a brutal claw swipe. These guys are DECIDEDLY dangerous, but thankfully are weak to Thunder and thus can be stunned with Thundara or higher. We even get to show off Thundaga this run!
Enemies aside, there isn’t much to really discuss in this dungeon. There’s no puzzles, beyond the puzzle that may not even exist in the sense that Daemon’s Court can send logs down here if you blow them up allegedly. It’s just a straight, if twisted, path to the end of the dungeon. Once there we meet our boss, the Dragon Zombie. For some reason you need Holy to reveal this boss too, even though it’s a ZOMBIE and not a ghost. Weird. The Dragon Zombie is one of if not the hardest boss in the entire game, with a single Stone Sahagin as it’s ad. The play area here is severely limited, and the dragon’s attacks are fairly wide spread. A laser breath attack, a lunge forward to bite at you (which puts the boss in a more feasible melee range for a brief period of time), a wing flap that causes a tornado to blow forward, and a wide spreading Bio Breath that poisons and does a ton of damage. The only real way to beat this boss is by jamming Holy spells into it. Once that’s finally been taken care of, the zombie re-dies and we get our drop of Myrrh. The single green tree in a field of dead and dying swamp land. Poignant.
Hope you all enjoyed, I’ll see you all next time…for the end of Year Four.
1 Like
Aw, Conall Curach… What a sad place. It might even be sadder than the village of Tida. It’s even the site of piece of lore that I’ve never forgotten ever since it first came out. I don’t think you can see it on your first visit, so I won’t say what it is, even behind spoiler tags.
Just watching this playthrough is bringing back all kinds of memories. What a good game this was.
If I end up missing it, because while this is basically blind I have an idea of what getting to the end entails…there might be a chance I miss it, so definitely mention it then.
Will do! It is optional, but I went back through the videos you’ve posted so far, and you haven’t missed it yet. I’ll keep an eye out in future videos, too.
Delay in post today due to accidently staying up until 4 playing Nier.
[B][URL=“https://www.youtube.com/watch?v=lZHZIhYLhlk”]Zodi Plays: Final Fantasy Crystal Chronciles [12] A Hallow Necropolis[/URL][/B]
[B]Video Length: 50:48[/B]
Starting us off this year, we head a little bit to the left of our destination to see it. The final Miasma Stream. Glowing and crackling with an unknown energy that I will likely dub Holy for simplicities sake. There’s nothing we can do here, so it’s best to wander off back to the dungeon and get it done. For today we’re doing Rebena Te Ra, the former capital of the world, now turned necropolis by age and miasma. It’s full of nasty creatures, devious puzzles, and one of the most frustrating single player things you can see: a puzzle designed for two players. Let’s detail the enemies first.
There are quite a handful of returning and semi-returning enemies here. Old friends include the Skeleton Warriors and Wizards, though they’ve gotten upgrades in terms of what they can do. The warriors can shield and have their own focus attack like thing, and the Wizard gets a level 2 version of Blizzard or Thunder. Gargoyles are back unchanged, though I feel like design wise they might look different? I cannot be sure. The Ghost is back, as is the Wraith to really send the point home that this is a dead place full of dead things. And while it’s actually completely different, the bat is back in the form of the Sonic Bat, which I never let do anything more than flutter around and the wiki is dead on information at this point! We’re a bit lacking on new enemies, but the enemies that ARE new are pretty cool. We have the Night Mare, a ghostly half-horse that can spew out elemental blasts and kick at you. Finally we have Cerberus, with a long ranged wind attack, fire breath, and probably some manner of ice and lightning attack too. Just a hunch.
Puzzle wise, Rebena Te Ra is the most loaded up with them. There’s key doors, switches we need to stand on, switches that require us to leave the safety of the chalice, switches that move the stage around, and more! Of primary note are the orb switches and blood sacrifice squares. The orb switches must be hit with a spell that matches the colour of the orb, and then struck with a physical attack. This is all well and good, and in the case of the white version can just be magiced in general. But the crux here comes from one singular puzzle that is the bane of many people’s existences. There is one puzzle where you must break and then hit two of the orb switches, within a time limit due to the shield and the orb switch itself respawning. This is a stupidly hard thing to do, involving either using Mog and having near perfect timing to get the switches free and hit the orb before they respawn, or using Haste (and or being a Yuke due to decreased casting time) to try and get the near frame perfect window to open the door these switches hold. Or, you can do what I did, a method that as far as I can tell has not been seen before (at least according to my scientist). Blizzaga, and the other -aga level spells, have a delay in when the spell actually “goes off”. So if you time it right, which is far easier than timing the other methods, you can cast -aga, cast the proper level 1 spell on the other switch, and then hit both with just a few seconds to spare. Our reward is mostly in how it affects our Bonus points at the end more than any material gain, but still!
The second noteworthy puzzle are the blood sacrifice switches, which I only really bring up because they’re a fascinating design choice. This game’s really only had two solutions to puzzles; put thing on thing, or hit thing with stick. This one involves having YOU get hit, which while it isn’t a dramatic change up in how the systems work, is at least unique. Of course they have an issue, in that the white glowing squares don’t “turn off” when they’ve accepted input like the other squares, being a little confusing in that regard, but nothing can be perfect and I can’t imagine how difficult this kind of thing is to program. Regardless, after the long and brutal fight across the ruined grounds of this city have concluded, we open up the Necropolis proper and go to meet our boss for today.
The boss for today is the Lich, a Yuke who’s bound her soul to a phylactery (probably the mirror in the boss room) and I must say I absolutely love this boss design. It looks cool, clearly evoking that sense of being a Lich while also still clearly being a former Yuke. I especially love how her skull has the face holes of her helmet. This of course raises a lot more questions about how Yuke work as a species, but still! If there was any race that could become Lich’s it would be the race that might just be living souls in armour that excell at magic. The Lich is a bit of a gimmick boss, not having much health by setting up two orb switches around the arena. You only have to hit each once with any spell to break them, but until you do she can’t be hurt, and she has an expanded spell list. The left side switch gives her Meteor, and it’s quick-casted to the degree that it might as well just be a “hit you from anywhere physical attack” though she doesn’t use it much. The right hand orb gives her a massive Chain Thunder spell that covers almost the whole arena and can hit multiple times, stunning for each hit. It’s brutal! Her basic spell she always has is Flare, which is actually super weak and easy to avoid. Since I, again, have a physical focus attack, hitting her is a little difficult even after I Holy her, but I realized that if I center in on her shadow it does for the most part work out fine.
With the Lich summarily sent back to whatever soul realm she put her soul into, we move on and collect our final bit of Myrrh for the year. We return home and have our celebration, as we prepare for the next year. This one is…going to be a doozy. I’ll see you guys then.
1 Like
It’s time for more of this!
[B][URL=“https://www.youtube.com/watch?v=VbWIgzsd7NY”]Zodi Plays: Final Fantasy Crystal Chronicles [13] An Enigmatic Desert[/URL][/B]
[B]Video Length: 36:31[/B]
And so begins Year Five. As we leave town, Roland basically outright tells us, even if he doesn’t realize it, that Gurdy is the sage from Malta who was hunting the Holy element. The poems make it PRETTY clear, and is meant to be your note to pay close attention to what he says. We also learn that the Jegon River has dried up, so we can’t access that chunk of the game…and while I’d love to go to Shella to figure out what’s wrong the layout of then Miasma streams means that we can’t go past Marr’s Pass. Well then. Luckily, the boatman has moved to Malta, so we’ve still at least got access to his boat. So let’s get a move on! Of course, we have events to encounter first…both of which are rather fascinating. We finally meet the Black Knight, and he’s…definitely not doing to well. Raging at an invisible creature that may not even be there, violently flailing about talking about how he’s definitely not going Hollow. I can’t tell if this is more or less funny due to Dark Souls being a thing. After leaving the crazed man to wander the roads alone, we come across Gurdy…selling bread to the Yuke caravan as a “modal of the world”. Complete with natural decay and death action! He swindles them out of 5000 gil and then gives us a lecture about how things aren’t always as they seem. Fascinating, and super rude.
Once we arrive at Port Malta, the boatman tells us we can sail off to Lynari Island, where the Selkie home city of Leude is located. I’ve always wanted to check out my ancestral home, so sure! I’ve never played into Year 5 by the way, so everything I see here will be completely new. And what we see in Leude is a bunch of well lived in nomads hanging out at the one oasis in this vast desert…who will steal gil from you every time you talk to them, as long as you’re a non-Selkie. What jerks! And there’s a jumping minigame that is absolutely AWFUL, taking 500 points to get even the most base reward, and FOUR THOUSAND to get an Orichalcum! The only thing I like about Leude is the art (the angel carvings are fascinating) and the emo Selkie talking about how their legends say they will one day return to the sea…and how he’s pretty sure this is just the other races hoping they’ll die. Jesus. After that, and some eaves dropping on the princess of the world, we leave the city and head to Lynari Desert, the final dungeon. Before the actual final dungeon, I mean.
Lynari Desert is…to put it mildly, kind of a hot mess. It’s a massive area with basically no defining landmarks sans a few scattered here or there, full of enemies that I think might respawn but I cannot be sure. And like, it’s all intentional because it’s this massive desert wasteland. It’s meant to be a place where you can get horribly lost. And let me tell you, I do get pretty dang lost here. But importantly, I do find some vital things. Specifically…I discover some standing rocks, and a prickly cactus, both with examine prompts. This must be where Gurdy’s poem leads to. Once I’m confident we have all the pieces of that…I think we’ll know where to go to get the Holy element! For now though, we must simply explore the desert. Eventually I realized that if you jump into one of the quicksand pits, you’ll find progress, and I do so, leading us to an area that actually has some clear idea of progression. let’s just talk about the enemies in this place now. The Scorpion is the most basic enemy here, able to poison with it’s tail and hurt with it’s claws. It’s design is fascinating, two giant tails growing out of two giant claws. We’ve got the Lamia returning, and later in the stage we find Sand Sahagin that may as well just be regular ones. We’ve got Zu, which are horrible flying death kite birds that spew elemental magic, and the nasty Chimera, with it’s fire breath, ice breath, and electro shock AOE attack. And of course, my good boy the Cactuar, an intentionally poorly animated Cactus that knows kung fu, lightning magic, and can spew a thousand needles at you (give or take a couple, since this does a flat thousand damage in regular FFs). All in all, a good set of enemies.
At the boss room, we find that he’s a little shy, and we must beat up his scorpion friends to get him out. After the scorpions comes Electro Scorpions, who are like regular ones but can stun you, and after them are Stone Scorpions, who are like regular Scorpions but take a thousand hits. Once they’re all dead, the boss appears! The Antlion, probably the worst boss in the game. He’s too massive for too small an arena, and too fast. The camera is weird in this fight too. The Antlion has four attacks, a petrifying breath that’s easy to dodge, a chomp attack with it’s mandibles which is fairly hard to dodge if you’re pushing to hard, an AOE smash with it’s claws which is deceptively hard to dodge and doesn’t actually physically affect you, sometimes concealing you’ve been hit in general, and once he gets low on health he can fire a charged up lightning beam, which is so easy to dodge it’s basically a non issue. I really don’t like this boss, something about it rubs me the wrong way and it’s WAY too beefy in terms of health. But once we hit it enough, it falls down and we have access to the first Myrrh tree of this year! And with that…it’s time for some groundwork.
So, I’ve now shown off every unique dungeon in the game. We still don’t yet know how to get the Holy Element, and Gurdy only pops up once per year. From this point onward, beyond showing off how you fix the Jegon River problem early and any memories we encounter, I don’t really have any more content to show you. So! Don’t expect a video Monday, work stuff has made that basically impossible. I’ll be putting up a Throwback Thursday video instead, if you can tolerate that. Instead, I’ll be working on…let’s say “the preconclusion” of FFCC. If everything goes well it’ll be up for next Friday, but that depends on a few things. So yeah, for now, you can bid farewell to FFCC. As for me, Monday is going to be “and then I recorded for 9 hours” day. Hoo boy. Hope you all enjoyed, I’ll see you guys next time.
3 Likes
I HAVE RETURNED!
[B][URL=“https://www.youtube.com/watch?v=_4b07XnjG44&feature=youtu.be”]Zodi Plays: Final Fantasy Crystal Chronicles [14] A Long Time[/URL][/B]
[B]Video Length: 18:50[/B]
And so begins the beginning of the end. Starting us off today, we say hello, and then good bye, to the princess of Alftaria (who is a clavat and lility crossbreed, not Selkie, that was just her cover). It’s actually a really touching scene, with an interesting sort of feel to it that really gets at the core of some of the themes this game has going on, which we will delve more into next time. It also ends up getting us a reward that basically means “all of the money” so that’s…also really good. But then…then comes the montage.
So, a bit of an explanation. In order to get events to trigger you have to just move around. There are other triggers, but as far as I can tell no one knows how to trigger any of them without any sort of intent. My friend who plays this game usually has all of Gurdy’s poem pieces by this point in the game and I very clearly do not. It’s just a mixture of RNG and luck and overall I just…I could not deal with it after recording for six bloody hours. In the end, we got a few good memories I showed off during the montage, and overall tried to make the best of it. Then I dived into the desert to solve the puzzle myself…only to learn that I had forgotten I tried out the first two halves of the puzzle before hand and forgot to not save! Ooops. Ah well, you don’t miss much other than DRAMATIC CAMERA ANGLES as the cactus and dead house get all sparkly. Regardless, after hunting through the wastes we find the holy flower, which gives us the Holy element, and lets us venture forth into the holy Miasma…where in we reach The Abyss, a place of darkness, and find the town of Mag Mell. Where the Carbuncles live…where you must spend three more in game years to get all the dialogue from. Screw that, to be blunt. All they say is stuff that we’ll hear next time, just elaborated on a bit more. I can do the talking for them.
Speaking of which, thanks to my good friend for doing that bit of voice acting in video for me. She’d like to remain anon so don’t go spouting off who she is if you somehow now, or I’ll hellban you from existence.
But yeah, that’s our video for today. I’m unsure if we’ll get the final out for Monday because I have work and also TWO HOURS OF FOOTAGE to cut through, but we’ll see. The end is in sight, my friends.
And so it ends.
[B][URL=“https://www.youtube.com/watch?v=Y-q1UVdqrUg”]Zodi Plays: Final Fantasy Crystal Chronicle [15] [FINALE] A Final Journey[/URL][/B]
[B]Video Length: 59:49[/B]
And so begins the final Crystal Chronicle video. With artifacts on our back, legendary whackin’ stick in hand, and three very useful and vital magical rings on our fingers, it’s time to head to Mount Vellenge, the final dungeon. It’s chock full of the most brutal monsters this game has to offer, as well as Chimeras. The main threat are Phantoms, who of course require Holy to defeat and are quite rude, casting Dark to curse us and slow to delay us, and bopping us with either a knife, staff, or different staff. Then we have the Sphere, which is honestly not that bad an enemy at all. You need to use Gravity to knock them down from the sky, but they’re not very strong and mostly just cast magic (including Bio, rarity). Finally, at least for the first half of Mount Vellenge, we have the Death Knight. THEY are a different matter, violently crushing us with sword and hammer, blasting out orb attacks, and doing a powerful spin attack. They’re not the main threat because Phantoms are EVERYWHERE, but every Death Knight fight is a major chance of getting killed and burning a Phoenix Down, which we sorely need to keep a hold of.
Mount Vellenge’s only treasure are Artifacts, and while I only get a few before the game decides for no reason that I can tell that I can’t carry anymore, I do get a good handul of them. The other mechanics, at least in the first half, aren’t very involved. There are giant boulders that requires 6 hits to take down, but that’s basically it. So let’s skip ahead to the second half of the dungeon. As we approach the impact site of the Meteor that caused all this, the ground gets more and more tainted with miasma, and it’s actually just stunning how weird and evil it looks. In this area Phantoms still thrive, but we’ve also got Tonberries again! Regular ones, who can probably cause major damage to us, but they can’t cast Slow, the power guys. We also have strange tentacles that can cast exactly one spell, and each tentacle has it’s own spell only it can use. The worst though is that dark crystals. In the second half of Mount Vellenge there are these dark crystals that turn off your Crystal Chalice! This is of course VERY dangerous, as the miasma will QUICKLY kill you. And of course, our final Mog Nest is here. How brave of this mog to live here.
Finally, we reach the boss. The source of all Miasma, and the thing causing us all to suffer. The Meteor Parasite. This is a…PROTRACTED boss battle, and I’ve seen fit to edit it, as well as the other boss fights in this final video. They last way too long. The Meteor Parasite is actually rather simple. I has tentacles that will cast magic or try to stun you with a non damaging stun attack, and it’s dangly dongle part will try to smash you or slice you, causing an extreme amount of damage. Hitting it is really hard, even with the ranged Focus Attack, and eventually I just resort to magic since it hurts the tentacles and actually has a chance of hurting the parasite. The parasite has three phases, removing it’s physical attacks in phase 2 in favor of casting Flare a bunch, and in phase 3 adding a sort of organic machine gun part that can VERY quickly kill you. Don’t get caught in the center. Finally, after what feels like an eternity, the boss is slain. Except…
A voice stops us, and we find ourselves in the void of thought. It is here we find Lady Mio. She’s been talked about here and there in the game, a princess who makes light from memories. If we had burnt through 3 years to talk to all the Carbuncles they’d tell us more directly that, there was once two gods of this world. Miro and Raem. They nibble at the fringes of thought, and are responsible for minor memory loss. Not all memories are as important as others, and some can and should be forgotten. Mio removes small, tiny thoughts, while Raem feasts on sad things so that we may grow from them. But the Meteor Parasite changed things. The Miasma shattered the Great Crystal that protected the world, turning it into the chunks cities are now built around. Mio still eats the little memories, but because of the Miasma Raem grows fat on despair. From a combination of hope and despair, Myrrh trees are formed. From concentrated happy memories, Mio creates the dew known as the water of life, Myrrh. But from the consumed darkness comes monsters. And the darkest of all are the Minions that serve Raem, who attack us in this voice of thought, red faced blobs that are quite brutal. Slaying them, Lady Mio tells us some of this, as well as eventually laying flat the themes of the game.
Memory is a funny thing. To go forward we need to have memories to inspire us, to help us grow. Too little and we’ll have learned nothing on our journey. To much and the weight of it all may crush us. An even balance of good times and bad are needed, if not entirely possible, but we must do our best to do so. A message like this is not one you’d expect to see in a game, and I think is actually quite powerful. Moving on, Mio says that if our memories shine brilliantly enough, perhaps we can defeat Raem. So we get…a fun little memory quiz. This is honestly perfect, and part of why the gameplay is married to the themes (which I’ll touch more on later). Suffice to say, imagine getting drunk and playing this with your buddies on and off for a couple months, just having fun and eventually coming to this place and now all of a sudden four stupid morons need to do trivia about a game that intentionally repeats itself for symbolism reasons.
We do our trivia quiz fairly easy, given that this is an LP so I’m sort of going to end up memorizing most of what happens…and also because Mio really low balls these questions. Jeez lady these are some basic ass questions. With that, we breach Raem’s room and find ourselves in one of the coolest looking areas you’ve ever seen, with some REALLY good music if I do say so myself. We meet Raem, who is super blase about the whole devouring despair thing. He actually makes note that Tida, the dead village, was particular delicious. And I really love that because up until now we really haven’t had any reason to actually hate this deity, but mentioning that powerful location, talking about how much he enjoyed it, really gets me going. Raem for his part is very powerful and beats up Lady Mio, and then we fight.
Raem is…a VERY difficult fight. He summons two of his Minions, a red and blue one. The blue one can flinch you but does less damage. They both respawn immediately after the death of both, so killing one is your best bet for survival’s sake. Raem’s main attack is shooting two orbs out that home in on you, comprised of either fire, ice, or electricity. They do as you’d expect by this point. He’s also got a close range shuffle to hurt you if you’re too close, and a sort of mid range strike with his arms. Heal after EVERY hit, no exceptions. Raem takes an eternity to beat because of how you have to handle the fight, I’m doing at most 10 damage to him an exchange and he has 300 health. Around 150 health left he starts firing out lasers as opposed to the melee attacks, and you really want to avoid the AOE they create because it’s a constant damage aura. Struggle, and you can make it through this fight. Raem, weakened, absorbs Lady Mio, and sends us all deeper into the void of thought.
And so we reach this area. I’ve always heard the final boss arena was beautiful, and they are not wrong. A cloud covered floor as we fight atop the very planet itself, against a monster of epic size known as the Memiroa, which is a typo for Memoria. There is not much I can say about this fight, because…while this arena is quite beautiful, it is TERRIBLE for an actual fight. All of the effects are white, so they blend in with the background, making dodging VERY difficult, and making the actual fight part of this final fight an INCREDIBLE SLOG. But really, that’s FFCC in a nutshell. During this fight, your memories will turn into orbs of your family. Cast cure on them to get Ultracite, powerful randomized orbs of pure spells, casting massive damage causing spells and also a worthless cure spell. The most important of them is the invincibility spell, however, which makes you invincible for awhile. This helps simplify the boss fight a little more. There are two “parts” to Memoria. Smash it’s tail to pieces and the real source of our despair will fall down briefly, letting us wail on it. The head part has attacks too, but they’re easier to dodge and better telegraphed (ie, at all). They’re also VERY capable of killing you, so don’t get greedy. This form also has 300 health, so just keep chipping away at it until you win.
The corrupt amalgam destroyed, Lady Mio thanks us. For a time they will rest, you can’t…KILL a god, that’s silly. But this will be a harsh lesson for Raem, one memory he can’t just eat away. She returns us to the thinking world, before the slowly dying Meteor Parasite, so we can finish the job. We strike it, and with that slay the beast pouring miasma into this world…curing it of the looming specter of death that’s haunted us for so long. We’ve done it…and now it’s time to rest.
And so, we bid a final farewell to Final Fantasy Crystal Chronicles. While I got a little salty at the end with the events not showing up how I wanted them to and the final boss actually being far too difficult, in the end I do adore this game. The message of the important of memories is a good one, and it’s there throughout the entire game. The very mechanics play into it, and while I’d try hard to change it to make the game come off a little better rand more fun to play, I’m not sure how much you could change without making the story impact as well as it does. There really isn’t much all else to say for this game. I enjoyed LPing it for the most part, and in the end I finally beat a game I’ve loved since I rented it so many years ago. I’d call that closure, and putting an end to this story that started when I was but a small Zodi is pretty symbolic of the game in and of itself. So thank you, Final Fantasy Crystal Chronicles.
So, what’s next for me? Well, this was a Patreon game that I chose myself, and if you know my schedule, that means next up is my own personal project, the Legend of Zelda retrospective! To explain for those who don’t know or don’t remember, I’m playing through all of the Zelda games in the order of the timeline. I do this because I’m a huge loser who wants to see if the story actually connects (it does, for the most part) and because I feel this is a good way of presenting the Zelda series to people (it sort of is?). But, last time we beat Ocarina of Time. That means we’ve got branching paths to consider! So until Friday we’ll be holding a vote to determine which path we go on next. But it wouldn’t be fun if I just told you them, would it?
So, [B][U][URL=“http://www.strawpoll.me/13346207”]here is the poll. Vote on it yo.[/URL][/U][/B] The choices are…
Power. Wisdom. Courage. Which do you choose?
That said this won’t be an immediate LP. I’m taking a break from big huge projects for a bit to focus on a smaller game from my childhood, one I had many a fond memory of. It’s short, easy, and most importantly a game I love that will require basically zero editing on my part, so it’ll be a good way to recharge after such a lengthy feeling project. Can you believe FFCC is around the same length as the Nightmare in Dreamland LP? It sure as heck doesn’t feel like it!
So yeah. I hope to see you guys next time, where we dip into something a bit more…powerful.
Yo, @moderators this LP is finished. Leave is post-inable for if people…you know, want to.
2 Likes
This topic was automatically closed after 2 hours. New replies are no longer allowed.
Oh, I’m glad to see this open again! I’ve been putting off the last video…
That last boss fight sure is a doozy. I remember having some trouble with the quiz, too, but I’m sure I had well over a hundred pages when I got to that point, and it didn’t help that I remembered different variations of the same event.
I mentioned something about Conall Curach earlier in the thread, and now that it’s open again, I can talk about that, too!
Remember the Selkie researcher in Shella, De Nam? He tells you no one believes in his research, and if you say that you do, he calls you out for not even knowing what it is. I don’t know what you have to do to trigger it, or if it’s just random chance, but he can start writing you letters once a year. He tells you that his research is about finding a way for people to survive in miasma, so all the towns wouldn’t have to send caravans out anymore. His theory is that if he drinks water tainted by miasma, he can build up resistance to it. It’s bad for his health, of course, but he believes it’ll be worth it. You can encourage him or not, but either way, he eventually tells you to go to Conall Curach where he’s waiting for you. If you do, you won’t find him. What you will find is a monster, I think a Sahagin, that drops his bandanna when you kill it. There are a couple ways to interpret it, but the one I always believed is that the prolonged exposure to miasma turned him into a monster.
As I said before, the story of De Nam is one that stuck with me ever since the game originally came out.
Yeah I muffed up telling Bob how to archive the thread but he fixed it because he’s a great admin.
But yeah, De Nam’s story is fantastic, and it’s a shame that just the nature of LPs as a thing basically encouraged me to not extend the game to an infinite length of time so I could show off everything. Especially given the events are all so random in addition to all that.