Zodi Plays: Final Fantasy Crystal Chronicles (Road Trip To Save The World!)

Once upon a time, Nintendo decided “hey lets make a cable that could connect the Game Boy Advance to the Gamecube” and everyone was like “okay but why?” and their reason was basically that having two screens might be a cool thing. And then that idea never ever took off in any sort of way. But, for a time, we had this ridiculous system that if they bothered to make games that used it, had stuff on the TV screen AND on the controller in your hands. Ridiculous, right?

At any rate, thus was made Final Fantasy Crystal Chronicles, a very weird multiplayer game that is still playable single player without using the Game Boy Advance link cable thing. An odd ball for Final Fantasy, it’s an action RPG/dungeon crawler sort of thing, where you walk around bopping people in the face and picking up things. At the end of each dungeon you fight a boss, etc etc it’s all very basic. What drew peoples attention to this game is that one, it’s super beautiful. I’d argue this is the best looking game on the Gamecube, and two it’s a goofy and weird multiplayer game with an interesting story.

So, how’s the LP going to work? Well, because I don’t have any way at all to actually play the game multiplayer, I’ll be going through it in singles mode. I’ll be doing my best to get as much done in game as possible, but I can’t promise I’ll get 100% of every memory in the game because that basically requires delaying the game by a lot, and as I’ve noticed with other games (cough Four Swords cough) no one really cares about something taking forever. So I figure I’ll be doing a round at each dungeon and then doing what needs to be done to beat the game and then doing that (It’s…complicated, and I’ve never actually beaten the game before!). I’ll be doing some off screen grinding to get stronger, but I’ll elaborate more on how that works in the thread proper. So without further rambling, let us begin our road trip to save the world.

Zodi Plays: Final Fantasy Crystal Chronicles [1] A Calm River

Video Length: 35:49

And so we begin, starting with the song Sound of the Wind, one of the best songs I’ve ever heard in a video game. This is the English version, here is one in Japanese if that’s more your style. It’s a beautiful song, that really touches on the themes of the game, which we’ll be exploring as we play. In this game you’re a member of HOME TOWN, a caravaner who’s going to save the village from it’s yearly threat of destruction by journeying to get the magic crystal juice known as Myrrh from fancy trees, three drops per year, that recharge the super crystal keeping the deadly Miasma from killing everyone and making someone’s house sapient. We call our town Malta at the request of my art friend in search of a joke that’s not actually going to work in this game. Ooops. And then we’re faced with our first mechanical decision: creating a character.

So, let’s talk mechanics. There are four races, the Clavat, Lility, Yuke, and Selkie. Clavats are hardy human type boys, wielding sword and shield, with well rounded stats that have a priority on defense. Lilities are the defacto main race of the game lore wise, a group of violent onion esque short people who will just tear your face off. Their stats are focused on strength, and they fight with spears. The Yuke are these mysterious bird robot/golem things with feathery arms that are wearing/a spirit animating armour and clothing. These odd magical beings are of course focused more on Magic then any other stat, and they use hammers to fight with. Then we have the Selkie, aka elf roma in the flavor. They are vagabounds that steal stuff and generally don’t make sense at all for the setting because how does a race of nomadic blue haired Kender exist in a universe where society is super closed off and insular due to magical crystals saving everyone’s life. Regardless of the sort of vague feelings of impossibility this race gives, they’re well rounded stat wise but with more of a focus on attack strength, and are best at charging up their attacks to do a Focus Attack. Each race has their specific tastes for food (the main healing item in the game beyond just casting Cure) and while that’s just a minor thing, It’s something pretty cool.

For the LP we will be maining a Selkie, mostly because that’s just one of the races I like the most and since this is a Patreon choice I let the person who suggested this game decide what I play (it was either this or a Yuke). I’ll be showing off the other races as well, don’t worry, we’re just going to be focusing on our Selkie, Ayah, and her adventures to save the world so that she can go back to stealing everything. After picking our race we then can pick our parents, and each one has some benefits worth going off. Miller, Farmer, Rancher, and Fisherman are all family trades that will send you various foods to help you on your journey. As a result they’re not super useful! The other family trades are far more useful, setting up shops in your home town. Except for Alchemist, which I’ve picked. It creates scrolls for weaponry and armour and stuff that you can use to craft stuff at a Blacksmiths. The Merchant is a store, selling all sorts of things you might need, and the Tailor makes accessories which might be super useful too actually, though of these Alchemist is “the best” choice.

With all that done, we can FINALLY set off on our adventure. Whereupon we are immediately interrupted by an event. Events basically happen at random, no idea when you’ll get what and so on, except for like the first one. We meet the Caravan of of the Lilty fort city Alfitaria, and among them we find the knowledgable moogle Stiltzkin, and some random moogle named Mog that opts to help us out since we’re in Single Player. But what does he help us with? Let’s go over that! So, as stated above, the world’s covered in a deadly Miasma that kills everyone almost immediately. Only crystals can protect against it, and our chalice that’ll be holding the Myrrh has a small crystal on it that protects us. Someone has to lug that thing around, and Mog’ll be doing that. He also allows for some degree of Multiplayer esque Spell Fusing, ie casting our spells over each other to make them stronger. This isn’t required in Single Player since you can just smush Materia together but I digress, it’s a neat mechanic that they have. Other than asking Stiltzkin about the world’s lore there really isn’t much else I want him to tutorial at us, so we leave after this, getting another Diary entry, and with it a memory.

But, a thing to note that I actually like…we have to actively ask about the lore of the world. In a fairly easy to skip tutorial, too, though you can go talk to him in game later to hear it again. It’s fascinating that this game, which is effectively a story driven RPG, requires your direct actual intervention to make the plot happen. You can just completely ignore the information you get about it and just play the game however and it’s fine. You need to actively seek the conclusion to get it. It fits into the themes of the game, and that’ll be fun to talk about as we go on. But enough prattling let’s…you know, actually play the game? We head off to the first dungeon, the River Belle Path!

As dungeons go this is a fairly basic one. It’s full of goblins (in a variety of sizes), which will try to stab you or throw a rock at you. Mu, these weird squirrel creatures that are actually a standard Final Fantasy enemy I suddenly realize, that run around trying to scratch you, and Hedgehog Pies, which cast fire spells at you and try to do a spike drop on you with their spiked butt. Overall, not that difficult, and it’s a good place to shake off the rust if you haven’t played this game in a decade like I have. Gameplay wise you have a three hit combo (which requires timing, not mashing) that can also be charged to do a Focus Attack (which attack you get changes depending on the weapon, and the Selkies charge faster and have longer range). You can also do a guard, though in the case of the Selkie they have the worst guard in the game, a half second flip of complete invincibility. Super hard to time, and given how you need to switch off of Attack to get to Defend, hard to actually use in combat. Magic is cast through the same basic principle of the Focus Attack (get to the relevant action, hold attack) and as you fuse spells to make stronger versions, you get a larger casting charge time but a longer range (it just looks smaller due to the AOE marker being larger, this is a mistake I hadn’t realized at the time). All in all it’s a good action-y combat system.

Now let’s take a look at progression, since this isn’t your standard Final Fantasy experience. You don’t level up in this game. Instead, in little nooks and crannies and enemies of the land, you’ll find Artifacts. They give you bonuses, ranging from +1 to a stat to having an extra Heart or command slot. Each Artifact you pick up in a dungeon gives you it’s effect for the dungeon, though at the end of the dungeon you can only pick a single artifact to take with you forever. Of course since redoing dungeons is completely free you can expect me to do some off screen grinding to get stronger. Single player isn’t hard, but it’s also shockingly unforgiving if you’re not careful. So we’re gonna need to be at our best.

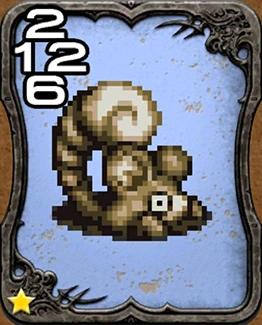
At the end of the River Belle, we find the Myrrh tree. But before us is a beautiful pond and waterfall…and behind the waterfall, a giant crab! The first boss fight is actually a little tricky, not lest of which because uh oh turns out he’s a little resistant to ice and I didn’t know that oops. The Giant Crab has a couple attacks, swiping with it’s claw arm, smashing it’s shield arm down, generating electricity by scratching itself allowing it to shoot a laser of electricity, and spitting out Slow spell bubbles. As you damage the crab, it’s arms eventually break off, and once it’s down to no arms it starts hoping around crazily (for no damage, shockingly) and casting Thundara a bunch. Not the hardest boss in the world, even with the Mu occasionally coming in to help it. We take the crab down, and get our drop of Myrrh. We then get a letter from the villager elder saying “hey by the way do a good job” and that’s nice. We pick the Moogle Pocket artifact because command slots are super important, and thus ends our first dungeon (and, after some faffing about with Moogle Nests, this video).

Hoo…that’s a lot of text huh? This game has a lot of it’s mechanics super frontloaded, so I’m not surprised we’ve got this much to discuss. Don’t worry, future posts won’t be as heavy. For now though, this has been the first video, so I’ll see you guys Monday for more of this. Hope you enjoyed!

3 Likes

Huzzah, new LP. Also, hello, nice pad you’ve got here. I’ll make sure to copy all this stuff (and the comments I have for Gravity Rush 2,) over to the other forum when it gets back up and running. But, as for now, should deal with this stuff.

Well, that was a nice song. And the graphics really are nice, given they were from almost a decade and a half ago.

Name your town? Is this turning into Animal Crossing? :stuck_out_tongue:

Year 1? Well, then. I expect this game to span some expanse of time.

Ah, friends. Always there for you in your time of need. Except when it’s funny. :wink:

One of these names does not quite match up. :smile:

Ooh, that is a nice map. Beats a sheet of paper, at any rate.

Interesting premise. And, also, yes, 'twas a tad fast, but, thankfully, that’s what the pause button is for.

“Right: Lots of monsters. Left: Lots of monsters.” …that’s a very helpful sign.

Ah, I see going outside the chalice range gets you zapped by the celestial bug zapper. :stuck_out_tongue:

And… ouch, that is fast.

Ah, rubbing rocks together. That brings back memories.

That’s one ugly crab. At least it’ll feed you for weeks?

One third? There’s gotta be a catch…

Interesting sidequest. Stamps.

So, all in all, this game looks interesting, and I look forwards to watching it. I’ll be making sure to record the enemies exactly as you first call them. So choose your names wisely. :stuck_out_tongue:

Enemies Defeated (Zodipedia version):
Goblin: 8
Goblin, Giant: 3
Hedgehog: 5
Squirrel: 10

Bosses Defeated:
Giant Crab

1 Like

To be perfectly fair, the Hedgehog Pies are actually called Hedgehogs. The Mu squirrels are a little weirder. This is what they look like in the sprite based games, and I think they’re actually give a quite good representation in this game.

Yeah, I can definitely see it. Their tails look a little more ‘boppy’ in this one. Ready to whack any unsuspecting traveler. Except, apparently, Moogles.

Crystal Chronicles is actually one of my favorite GC games but I don’t think I’ve ever played 4-player with people, despite owning like 3 of those GBA>Gamecube cables. Though the game might be easier in single player since having a moogle carry the chalice is so much better (when they’re not tired).

I’ve never played it four player either but I can basically assure you just by how the game feels, that it’s definitely a game that seems like it’d be wonderful to play multiplayer. Though yes, it is far easier in single player. Mixing spells plus the enemies being weaker (they DO scale, oops!) plus the Mog friend make it far, far easier. And to be fair the game isn’t that hard in general?

1 Like

I got to play it with two other people and it was really great, though scrounging up money for the cables as kids wasn’t too easy. Scaling with three players got painful towards the end from what I remember. Most of the time we’d just dump the chalice on the ground once we ran into a group of enemies so it wasn’t as much of a chore as you’d imagine.

True, but it also changes the dynamic of the game in a way that seems pretty interesting. Without someone lugging the Chalice around, the game is far less mobile and more about standing your ground, which is more possible of course if you have multiple people. It’s just neat how that dynamic sort of just works.

Time to set out once more on our crystal caravan. Let’s go!

[B][URL=“https://www.youtube.com/watch?v=L75Yb7Xm_c0”]Zodi Plays: Final Fantasy Crystal Caravan [2] A Vast Forest[/URL][/B]

[B]Video Length: 27:58[/B]

Starting off this episode, I introduce you all to the blacksmith’s son, Zorhm. Gotta love those random H’s in names huh? He’s a Yuke, so let’s talk about Yuke’s for a second. Yuke’s are the most magically inclined race, having the highest base magic stat and being able to cast magic faster than any other race. They fight with hammers, which are decently strong, but where they really excel is that for some reason their defend command is the best in the game. After about a half second of charge time, they become invisible and as such completely indestructible for as long as the button is held. Sure, they can’t move during it, but this is the ultimate perfect guard. Since Yuke’s are weird potentially eldritch monsters that inhabit an armoured shell of some sort (and may or may not have a physical body underneath, it’s not entirely clear in this game, but if they DO then those striped feather hands are their flesh which is fascinating) so their defend command makes SENSE, it’s just…the Clavats are supposed to be the best at defense but all they have is a shield. It’s a little goofy. Anyway, let’s get a move on.

Today, we start off our journey by returning to Malta to pick up some things (and learning about the legendary Black Knight from the Alfitoria caravan, who I realize probably came down to this area for some grinding which I find hilarious). Specifically, we’re going back to check out the new Blacksmith. The way Blacksmith’s work is that you bring them the scroll that has the item you want on it, plus the material’s it needs, plus a fee of gil, and they make you the item. In this case, we make some Bronze Armour for ourselves, and a Bronze Belt. We don’t have the resources to improve our weapon, sadly. We also find a so called Secret Item. Every town has one or more of these, more or less, and I think they refresh after every dungeon run but it might be after every year cycle, I can’t quite recall. Point is it’s a nice little semi rare item you can find, in this case a seed. Nice. That’ll make a good gift. With that all done, it’s time to set off once more!

After some brief detours to get the proper crystal property for our chalice, we head to the Miasma Stream…and find one of the most beautiful sights in the game, while also the most horrifying. Maybe it’s just me, but the Miasma Stream areas always feel me with this unending dread. This idea that the Miama, this ever present death cloud you cannot escape, has places on the world where it’s THIS thick, is horrifying to me. And look at the place, it’s dead and twisted, and the Miasma is thick enough to be extremely visible and walking through it has the Miasma actually PUSH BACK against you, it’s so thick. Even the meager protection of our Chalice isn’t 100% effective here, and while we CAN penetrate the Stream and move on if the element of the Chalice and the Stream match, you definitely get this feeling that if the elements didn’t match you might just die outright, worse case scenario. The music too has this haunting, beautiful tone. This is a fun little rompy game of silly goofy multiplayer fun, but the Streams exist to remind you that no we live in a death world and without the crystals that we spend all this time hunting after, we’d be dead. Oh so dead.

We make it through the Miasma Stream, and before us lays the Mushroom Forest, our next dungeon. A vast forest of oversized fungi, full of fairly dangerous enemies. This might actually be the easiest and shortest dungeon in the game, for all that I’m building it up for. It’s a little maze like, but this early in the game the mushrooms aren’t fully grown yet enough to be an issue, though in return we can’t find everything on our first attempt. As for enemies, we have the Tiny Worm, which…crawls around and tries to poke you. Not the most threatening of foes. We have the Hell Plant, a stationary enemy that shoots little bloops of exploding plant goo at us, and is surprisingly effective at blind siding me with sap. The Gremlin, a bouncy little imp with a bon bon on it’s head like a Moogle, that lashes out with said bon bon so hard that you flinch and fall over a bit if you get hit, which makes this the strongest enemy in the area. And finally, the Ahriman, a classic Final Fantasy enemy, the magical floating eye that spews out eye lasers (in this case they slow us) casts magic (in this case Thunder) and swoops at us. In order to beat them we need to make Gravity with our spell fusion to tear them from the sky. Then we can bop em on the face eye. All in all a good enemy set to deal with. During our travels in the forest we find a Mog Nest, and the Earth Pendant. The Earth Pendant is the artifact we’ll be choosing for this dungeon, as it gives us an EXTRA HEART. That’s super good. But to get it, we need to beat the boss.

The boss in question is a Malboro, another Final Fantasy main stay! Unlike it’s normal appearances, this one can’t throw a billion status effects on us…but it can still status us down pretty hard. It can cast a massive area Slow (I call it Slowga, but given that apparently a level 1 protection item can stop it, it has to just be a massively boosted Slow) that you can only avoid by running to the other side of the arena, it has it’s Bad Breath move that inflicts poison on you, and it can cast the non damaging Curse spell, which reduces all your stats by half. Luckily, we found the spell Clear in the forest, so we can purge any of those status effects from us with ease, and we really should. The Malboro’s only actual attack is jabbing it’s tentacles into the ground, flailing them around and trying to stab you, but it’s semi random in how their distributed so it’s not that difficult to avoid. Since the Malboro is immobile it’s arguably easier a fight than the Giant Crab, though it’s weakness to fire isn’t as exploitable as the Giant Crab’s weakness to Holy. The adds in this fight are two Hell Plants that respawn periodically, but they’re not that big a deal to remove.

With that all said and done, we get our choice of artifacts and our drop of Myrrh. Two thirds done towards saving our village! To commemorate this achievement we get a letter from our Mom…giving me what is probably my most favorite phrased way to say this. Remember, what is not ours, actually, is ours. So take everything you can! Look, it’s a joke because this is a multiplayer game where bonus points decide who gets first pick of the artifacts and it’s meant to encourage the player to snatch up items, I get it, but come on Mom. Stop being such a stereotype. We live in a world where “a wandering vagabond” is someone who just kinda walks around town a little more than usual. Stop trying to steal from everyone! We give her a seed of some sort and rest up for the next adventure, which we will get to next time. Hope you all enjoyed.

1 Like

Even not being as strong as the enemy normally is, having a Malboro as the second boss of the game is extremely rude. There’s, like, one or two instances in the series of those guys not being a total pain to deal with.

1 Like

I’m pretty sure I had played a regular Final Fantasy with a Malboro in it by the time I played this game as a kid and let me tell you, this boss was SO HARD as a small Zodi because of that mental image of “a Malboro will just ruin your entire day”.

Onwards, the caravan rolls.

[URL=“https://www.youtube.com/watch?v=WhS9dTfi0iA”]Zodi Plays: Final Fantasy Crystal Chronicles [3] A Dark Mine[/URL]

Video Length: 35:08

Starting us off today, we make our lovely Lilty caravaner so we can learn a bit more about how those little onion heads work. The Lilty race is the strongest physically, wielding massive glaives and bouncing the chalice on their head because their arms are too stubby to hold it up above them which is hilarious and ridiculous. The starting glaive they have has the same kinda focus attack the Yuke’s do, a jump attack, but it shields them from harm during it. The Lilty defend command is pretty bad, holding up their stick to defend. I think it still makes them take chip damage, and unlike the Clavat guard we’ll see next time, doesn’t block status effects.

With that out of the way, it’s time to visit the first town in the game! The first that isn’t Malta, at any rate. Town’s are interesting in that they change over the course of years, some stores not being available, some moving around, some changing prices and stuff. If I had infinite time I’d do all my shopping and smithing at Malta, but I don’t so let’s stick with what we’ve got here. We talk to some of the townsfolk, learning of their various plights. One has a womanizer grandpa and it sucks, one feels bad about her husband being dumb, one is a child who’s Mom left them to go on “vacation” after giving her Dad “something called a divorce” which I just…I just cannot handle this because the logistics of it means she either just left the barrier, crystal chalice or not, or she’s literally just sulking at the edge of town hoping no one notices her. We also get some word of people being forgetful on their travels, which I mean that’s fair. Who wants to remember the horrible death fog?

Mechanically, we sell basically all the trash I picked up along our adventures, using the combined gil to buy the Warrior’s Weapon scroll plus the Alloy needed to make it, and then proceed to make it, getting us the dual shooter. A very powerful racket that is going to give amazing dividends once we actually get to put it into use. Sadly, our old Racket must just be crumbled up into dust because you can’t sell old equipment in this game but they still take up inventory slots. How annoying.

With our business in Marr’s Pass done, we make our way towards our final destination for the year. The Mines of Cathuriges. This is effectively our “final dungeon” for our first year, and it shows. It’s a fairly winding mine system with huge rooms with multiple paths that don’t lead anywhere and some pretty violent monsters to contend with. The main force we’ll be fighting are Orcs, which are fairly rare in Final Fantasy. These green jerks run around wielding weapons like a battle axe, or a hand axe, or a magic stick, but they’re all just Orcs to me, and they all die in one Focus Attack now that we have our Warrior’s Weapon. Overall not that threatening, and in fact pretty hard to aggro. The second enemy we face are Bombs, who can Fire, Meteor, and when slain explode with a fairly weak explosion that a sets you on fire. Dangerous if you encountered a large group of enemies with a Bomb for support, but overall not that big a deal. Finally, we have the Ogre, a huge monster wielding giant smashy tools. It does a ton of damage, and takes a lot of damage, but given our increased Focus Attack charge speed we’re able to tear it down rather quickly. All in all the enemies are interesting here in that, they are all fairly threatening, but would be far more so if the encounters kinda put them together. It’s weird because this dungeon feels…a little empty, like they have more to show us but just aren’t here. Maybe it’s because it’s still early game and they want to ease it in on us.

The dungeon itself features a main gimmick that we follow for the first 2/3rds of it, babysitting a mine cart that’ll bust it’s way through barriers that are in our path. It’s not super complicated, but I manage to mess it up at least once because I genuinely forgot this cart even existed. I’ve played this game before, sure, but damn if I remember anything past like, a handful of dungeons. At the end of this one, we face the mighty Orc King, a massive red orc with a sceptor axe type thing and a hammer. He is surprisingly fast for his size and armament, quickly casting Flare spells and bashing us with a mighty mallet. He’s apparently weak to fire but given the power of our Focus Attack (and my desire to just keep Haste on to out move him) means I didn’t actually weak if that’s true. Orcs can come in to help him but they’re really more of a distraction. Once he’s almost dead the Orc King starts casting a self destruct spell, and while you can kill him during this there’s no benefit or reward for doing so, beyond not taking a large amount of damage that could kill you if you’re not careful. With a mighty explosion the Orc King dies, freeing the way towards the tree. We collect our final drop of Myrrh, and head home.

At Malta, we celebrate. We perform the ritual to give the three drops of Myrrh to the crystal, recharging it and protecting us for another year. We sing and dance, as the memories of our adventure pass us by in diary form along the screen, a feature I completely forgot and super appreciate. We laugh and sing, because we know for another year, we are protected. Time marches onward. And though our journey has ended for the year…this is just the beginning of what will be a truly fateful crystal caravan. I hope you all enjoyed, I’ll see you guys next time…for year two.

It’s time. Thus begins year two.

[B][URL=“https://www.youtube.com/watch?v=EBQTgFrB9zY”]Zodi Plays: Final Fantasy Crystal Chronicles [4] A Mighty Wall[/URL][/B]

[B]Video Length: 27:08[/B]

In this episode, we begin Year 2. So, let’s discuss the whole yearly cycle thing. Every year, the miasma streams change element, locking off some areas and making some areas more easily accessible. It’s pretty neat, though definitely annoying after a fashion. After beating a dungeon, it spends two years in a recovery period. You can still grind in it for artifacts, but you cannot get Myrrh from it. After those two years are up, the dungeon is back in working order…and also has upgraded. Each dungeon has two tiers of upgrade it can get to, and each upgrade changes the enemies inside and in some areas, the layout. The dungeon also gives better loot as well. Additionally, the year changing means all the events you can run into have increased. After all, everyone is changing along the years with you. It’s strange to say it, but despite being a desolate wasteland of miasma, this is a very well executed living world. It feels like the world kind of exists. Every year we also receive a bit more information about the lore of the world from Roland, in this case…if you can’t get enough Myrrh, please return. There was once a man who tried to rid the world of Miasma. We don’t know what happened but miasma exists and his town doesn’t so…yeah.

And so we set off, after preparing (and showing off the power of Clavats, aka: a shield) and we immediately run into the Marr’s Pass caravan! They’ve been attacked by the Black Knight…and instead of actually fighting with skill and precision as his legend says, he just kinda flailed at them wildly screaming about nonsense. He still WON their fight, but that’s a far better outcome than I expected. We also encounter Bal Dat, of the Striped Bandits. Called as such because they’re secretly bandits and they’re not so secretly wearing striped outfits. Unfortunately for him, the old man they work with failed to actually steal from us. Make no mistake, they will in the future steal our stuff, but for now this is just an introduction to these weirdos. With all those events out of the way, it’s time to head to our first dungeon of the year, one that just popped up over said year!

Say hello to then Goblin Wall. It is, shockingly, full of goblins. Including wizard goblins! There’s also Flans, that shoot a paralytic spit out, and Electric Jellyfish that cannot be touched to being electrified. We also have the simple, humble bat, which takes far more hits to kill than anything else in this dungeon, showing why you want beyond all else to use Gravity on fliers. Another thing this dungeon has a lot of is treasure! It’s gigantic, has many enemies, and all are prone to dropping nice loot. We don’t really pick up anything super good (though on my grinding run after this I DO pick up something useful) but we get a LOT of it, so we’ll at least be making a lot of money here. The boss of the Wall is then Goblin King, a wizard goblin of untold power! He’s also pretty smart, setting up a barricade we need to get through first before actually fighting him. The fight itself is pretty simple, the King casting -Ga level spells, Slow, and Bio to try and kill us, and occasionally bopping us with his staff or teleporting away to stop us from hitting him. He never does the latter in this fight for some reason.

Unfortunately for the Goblin King, his weak defenses are his down fall. We dispatch the king and send the goblins running, and gain access to the tree in his bed room. Another drop of Myrrh collected, one third of our adventure this year complete. What else could await us? Find out next time. Hope you all enjoyed.

1 Like

Onwards, to glory and Myrrh!

[B][URL=“https://www.youtube.com/watch?v=3GnaQfzEbDs”]Zodi Plays: Final Fantasy Crystal Chronicles [5] A Brutal Home Invasion[/URL][/B]

[B]Video Length: 28:51[/B]

Starting us off today is the fact that uh…no Myrrh is available in this or the next over area on the map, so we’ve got a lot of travel to do! I cut through mooost of it, and in the future will probably remove most of the map travel entirely, I’m just curious on what all your opinions on it are. So please make sure to comment on that. At any rate, during our travels we bemoan the fact that the blacksmiths at home are aren’t yet upgraded enough to work Master weapons and Mythril armour, meaning we’re gonna have some degree of item bloat just kinda floating around in our inventory for awhile as I do my best to hold onto all these materials and blueprints. Aside from that nothing actually HAPPENS during our ride across the world. It’s been a pretty uneventful leg in our journey. And so we move on, past the Iron Mine Downs to the Vale of Alfitaria, the homeland of the Lilty race. We make sure to make a quick stop at Alfitaria proper, taking in the sights, looking at all the stores but not buying anything because we’re surprisingly broke, finding a moogle friend, and finding an NPC who is apparently Sol Racht’s wife. So that’s cool. But our time here is short, for we have a dungeon to conquer, and so we head off to Moschet Manor.

Moschet Manor is one of the more interesting dungeons in the game, both in flavor and mechanics. It’s not the best dungeon, layout wise it’s one large hub with seven rooms branching off of it, each locked by a slooowly rotating switch that only allows you to open it when the switch shows the symbol of your race. There is absolutely no danger to waiting for the switch so it’s just tedious, but the idea of us invading this large mansion to loot it for goodies is really cool. It also speaks to the point of…we saw the Orcs and Goblins be organized, but we figured those guys were kinda lesser life forms since they’re monsters, they don’t talk and don’t try to discuss things with us. But Jack, the Gigas lord of this manor and his wife Maggie the Lamia, are both clearly in control of their senses (if Jack has anger issues) and probably could of been persuaded into letting us just go and get their Myrrh and be off. Instead, we’ve decided to murderer all ten Tonberry Chefs in the place to entice Jack out so we can find the tree that way. How rude.

The main enemy of the dungeon is the Tonberry Chef. Unlike Tonberries in regular Final Fantasy, these guys aren’t capable of using any vengeful, monster-killer hater moves to one shot you into oblivion. Being a chef is stressful enough for them to let out all their anger during that, I imagine. So instead all these guys do is stab. To be fair it IS a lot of damage, and apparently they can cast slow to make it harder to escape their knife, but really given their speed they’re barely even a threat. In contrast to that, the other enemies in this area are REAL dangerous. There are Coeurls, tentacle cats that can cast all the elemental damage spells, and unless my eyes are mistaken in this video, can do spell fusion with each other if they’re smart and lucky enough timing wise! We also have to contend with gargoyles, buff stone monsters that need to be knocked out of the sky using gravity, and take quite a beating even after they’ve been dropped too. They have a physical swipe and also spit out elemental blasts. There’s also a random gremlin but it’s as dangerous as the ones in Mushroom forest. Which is to say, “surprisingly” because it has Tonberries near it so if it hits you you might get comboed. Also, while I say healing is not available in this dungeon, I am in fact wrong. There are two treasure chests in the south west corner of the hub that I just DID NOT see, because my screen is too dark. So in the future I’m going to…change that, definitely, because that would of made a lot of things a lot easier here.

With all the chefs slain, Jack Moschet finally takes note of the fact that dinner isn’t happening any time soon. In his rage he attacks us, and once we bop him Maggie comes out to assist her husband in expelling the jerk Selkie that snuck into their home, murdered their staff, killed their pets, and raided their treasure chests (me). Maggie can smack at you with her fans for some weak damage, but her support spells are far more dangerous. She can fully heal Jack with her love, and she can cast Slowga to make it harder for you to avoid Jack’s attacks. Given Jack is surprisingly fast, this is really dangerous. More dangerous, once she gets to low health she’ll start trying to cast STOP instead of Slowga, which will leave you utterly vulnerable for a few seconds, potentially spelling your doom. Once you hit her enough she’ll go hide in a corner and cry, though. Jack in the meanwhile is pretty brutal, attacking with powerful punches, a ground pound that covers a fairly wide area around him, and ice breath that’ll freeze you in place if it hits (though if you have a Water element on your chalice you’ll be fine). Once you take out Jack the fight is over, the couple running from their home. Likely to call the monster police on us. We get our Myrrh, and muse about how perhaps we should of knocked.

And that’s our video today. See you guys next time for the end of Year Two, and for another of the coolest dungeons in the game from a pure flavor standpoint. And also, let’s say, some fun cables.

1 Like

It’s time to get in.

[B][URL=“https://www.youtube.com/watch?v=iTbmPF59aGU”]Zodi Plays: Final Fantasy Crystal Chronicles [6] A Peaceful Village[/URL][/B]

[B]Video Length: 36:03[/B]

Starting us off today, we’re actually NOT going straight to the dungeon. For you see, I have obtained, finally, the GBA to Gamecube link cable! So now I can make use of that mechanic in single player, as well as show off the minigames in multiplayer! In order to get this footage, I needed to set up my Gamecube, hook the GBA to Gamecube cable to the Game Boy Player attachment, connect the Gamecube side of the cord to the Wii, plug the Wii into the TV so I could actually play the game proper for navigation purposes, then hook the Gamecube (serving as the GBA) to the capture card to then connect to my computer and the TV so I could record it. Suffice to say, my room is already a tangle of cords but this is getting ridiculous. But, I can now show off the GBA screen, and I will do so here, now!

In single player, the GBA is connected to Slot 2, and serves as a simple radar. It tells you what the bonus objective is, and shows you a simple map layout of the dungeon you’re in, localized to your area. However, if you PAINT your Moogle, the map changes form. If you paint your Moogle red, you get a monster radar. Given this also removes the layout map entirely, this isn’t really all that good an option since it’s not REALLY that useful to know the location of enemies when you can’t really tell where they are in the world in relation to you. And really once you’re close enough for the radar to pick them up, you know they’re there. If you paint your Moogle blue, you get the Treasure Radar. Has some flaws similar to the Monster Radar, but is more useful since there are cases (cough Moschet manor has cure and life I just missed then chests they’re in the bottom left and right corners) where say, your screen brightness makes it hard to see treasure chests. My favorite however, is if you paint your Moogle green. You get the Monster Data screen! It shows you the name of the monster, plus it’s HP. The HP is less important since health is super abstract in this game, but it also shows you any elemental weaknesses or defenses they have, as well as if they are Flying or not, which would honestly be self evident but hey, it coould help. It also shows what loot item they drop, which…I can see being useful in Multiplayer mode, where radar is determined by controller port slot, letting you slip in to take a specific drop from an enemy you really want. Overall, given the GBA’s screen is as black as Canada in winter none of the radars are all THAT useful, especially in single player when you’re holding the Gamecube controller to play instead of the GBA controller.

In Multiplayer, the same radar stuff exists except since you must be played 1 you’re stuck with the Map radar when playing solo multiplayer, which is a thing you can do. However, if you’re doing this, you can go to any Moogle who’s given you a stamp that you have the full set of to play a minigame. Which is to say, you play Blazin’ Caravans. Blazin’ Caravans is a racing gamae where there are eight caravans aside from you but as far as I can tell only three of them are actually designed to be difficult opponents. You hold A to drive faster, press B to slow down, steer with the D Pad and fire off Magicite you pick up with the L or R button. If you touch food your character in FFCC likes, you get a speed boost, if they don’t like it it’s a speed down, and if it’s middle of the road…you get a dinging sound that doesn’t mean anything. To put it bluntly, Blazin’ Caravans is one of the worst things I’ve ever played. It’s worse than the GBA Mario Kart game, and that’s PRETTY BAD. The music has kind of grown on me by this point, but it’s still got this clear bad touch to it. The animations and sprite work are…passable, but imagining this on an actual GBA screen instead of the Gamecube’s Gameboy Player is giving me shivers. Mechanically, you pick the D class cart so you have good handling and then you win unless you understeer and end up in the grass for roughly a minute in which case all the other caravans pass you and then you lose. Or, god forbid, you’re using the Gameboy Player and accidently hit X or Y, changing which Caravan you’re looking at FOR NO REASON AT ALL, making you drive into a wall for the full race. And your reward, even if you win? Big ole goose egg. Nothin’. You don’t get anything but the opportunity to play more of it. I would not recommend it. I find the fact that Blazin’ Caravans is so immediately bad fascinating, because not a lot of people played FFCC, and an even smaller number of those people have ever seen seen this, let alone played it. So this is some rare stuff on screen right now. But it’s SO BAD, so it’s like…yeah, I got to show off this fairly rare thing. Too bad it sucks!

Anyway, back to the episode proper. We head off to Alfitaria to sell some stuff (meeting the Alfitaria caravan in the process, gaining what is one oef the simplest, weirdest events in the game) and then head off to our next destination. I’m sure you spotted it last time, there’s a village in the top right hand corner of this part of the hub world. It’s called Tida! Let’s go give em a visit. Except when we arrive…things are not quite what they seem. Tida is a necropolis, a dead village. A village who’s Caravan never returned with Myrrh. The people stayed, till the very end. None tried to leave for the distant Alfitaria in hopes of somehow surviving. They all remained, as the crystal slowly shrunk down it’s radius as it died. This is why Roland said we must return. This blighted wasteland of death and decay. The game doesn’t force you to go here last on Year 2, you can in fact avoid it for the most part. But it felt important to the themes and feelings of the game to do it here and now, in the end of Year 2. It goes without saying that, if we had kept the default town name, this village would be one upside down letter away from being identical to ours…and really, that’s just it isn’t it? Every village we’ve seen in the game. Malta nee Tipa, Marr’s Pass, Alfitaria, Sheela (though we’ve only heard of it), they all have a crystal, all have a Caravan. And every single one can end up a dead zone of monsters. It’s honestly scary in the real way, crawling up your back. I love this place, and I also hate it.

Enemy wise, we’ve got a few Gremlins again, plus Carrion Worms, far larger versions of the giant worms from the Mushroom Forest. Carrion Worm’s can cast thunder magic, and can spew out an AOE poison attack, which is pretty dangerous if you don’t get clear or cure soon, which we thankfully do. There’s also a new type of plant enemy, which I misidentify as a Hell Plant. If you pay attention you’ll see one spit out a bit of poison, which shows they’re actually just a reskinned enemy. I’mma call them Carrion Plants because all my sources say it’s the same enemy even though it’s blatantly not. There’s also Bomb’s to contend with, and they’re used a bit more effectively here since there are other caster enemies, and some bulkier boys to serve as interesting encounters. Speaking of, there’s Skeleton Soldiers and Skeleton Mages here as well, and they’re fairly basic for what they are. Bop em in the face to beat em, try not to get stabbed or styled on by magic.

The dungeon itself starts out simple, but swiftly develops into this fairly elaborate maze of sticky web plants that a single Fira (or if you’re bad at aiming like me, two Fira’s) can permanently remove. It’s honestly kind of annoying a mechanic, but it does give the place a more oppressive feel, which I feel works to a degree. This is one instance where I’d of liked to be able to actually pay attention to the Treasure Radar, I had it set up for this dungeon and I missed a treasure chest. Ah well. Finally, after pushing our way through the annoying plants, we find ourselves at the boss of this dungeon, Armstrong.

Armstrong is a fascinating boss. An animated house, covered in dark pustules and nasty mushrooms. It scuttled around on it’s foundation quickly, zipping too and fro. It’s attacks are fairly brutal, an AOE slow mist it shakes out, a poison breath attack, shooting cactus like needles out at you, swinging with it’s massive fence arm, and of course using that chimney to fire a cannonball at us for massive damage. On top of the attacks and the speed, Armstrong is fairly tanky. Thankfully, he is weak to fire magic, so a quick cast of Fira will set him on fire, halving his defenses so I can focus attack him down. With this strategy we’re easily able to dispatch Armstrong, and gain our final drop of Myrrh for the year. The only big of greenery in this area, a glowing tree of translucent blue. A reminder of what they could not achieve. We Myrrh and new artifact in hand, we return home for the ritual and the celebration. Another year put to rest. Another year out in the world. Three more dungeons drained for two years, meaning we’ll have to go even further beyond to get the Myrrh. I wonder what we’ll encounter on our adventures. All I know is that we won’t become like Tida.

I hope you all enjoyed, I’ll see you all next time.

And so we begin year 3

[B][URL=“https://www.youtube.com/watch?v=7oUWlkSl_wI”]Zodi Plays: Final Fantasy Crystal Chronicles [7] A Serene Sluice[/URL][/B]
[B]
Video Length: 31:57[/B]

Today’s episode is quite an eventful one! After preparing in Malta and leaving home (learning about an apparently mysterious element that can control them all) we encounter a TON of caravan events. We meet the Striped Bandits again, questioning them about their willingness to murder and then running over their Moogle when they try to rob us. We see the Marr’s Caravan at it’s best, being given random weapons and crafting items because we’re nearby, and also at it’s worse as it literally tries to murder a man for telling make believe stories. The man in question is Gurdy, and he tells us of how cactis don’t like getting hit by lightning. Good to know. We also meet the last two caravans of the world, the Selkie caravan from Luam or something I don’t know I’ve never seen it, and the caravan from Sheela where all the Yukes live. The Selkie caravan just kinda encourage us to be cool, while the Yuke charge us 10 gil to hear some in universe information about monsters, which is pretty cool. Also, we discover that the princess of Alfitoria is missing! That’s kind of a big deal so uh…we’ll keep an eye out for her just in case.

After a veritable smorgasbord of events, it’s time to…you know, actually do the new dungeon. Say hello to the Veo Lu Sluice! A pretty large area, a bunch of ringed pathways around a bunch of lake like things that ensure that the Jegon River is nice and full of water. It’s pretty stylish and cool, though I wonder how they constructed it. Given Yuke’s are responsible for it’s creation, that explains why it looks kind of “natural” I guess, is that makes sense. Regardless, it’s a pretty cool dungeon. It’s infested with lizardmen, generic melee enemies (with a thunder wizard variant) who are quite annoying given our newest weapon has a different, non ranged Focus Attack. They’ve got Gigan Toad’s with them, massive lumbering frogs that can lash out with their tongue, or cast ice magic. And of course we have the gryphons, massive birds that have a variety of strong physical attacks, and can shoot out a gust of wind. The weakest enemy here is the Water Flan, a jelly that can headbutt and do a slow breath attack. All in all, the enemies that are here are pretty strong, but nothing we can’t handle. Artifact wise we don’t get much, but we DO pick up a Blizzard Ring. Magicite Rings like this allow us to use Magic whenever, and it doesn’t even take up an inventory slot. They’re pretty good!

After fighting our way through the Sluice, solving some interesting timing based puzzles, we find ourselves at the boss. It’s a shame the Myrrh tree sprouted up so close to the Golem guarding the Sluice, because now we’ve got to destroy it! It doesn’t seem to like us, either because of Mog or because of our crystal chalice (probably the later) and it goes into a super battle mode. And what a battle mode it is, Golem is a pretty dangerous boss! A powerful right hook, rocket fists (which are thankfully easy to avoid), a slow gas like every other boss, a laser beam that freezes you solid in addition to causing damage, and an AOE death laser that sets everything on fire with an explosion. This is a pretty hectic boss fight, and the two Water Flan additions aren’t helping matters. But, we’re able to push our way through, beating the Golem to death with our fancy stick that makes giant explosions when we touch it to things, and we get our first drop of Myrrh this year. Two remain.

I hope you all enjoyed, I’ll see you guys next time. Be sure to take in the sights of the Sluice before you go.

This game’s soundtrack is really good, but I think Veo Lu Sluice has my favorite track of all. It’s nice to hear it again!

(By the way, the Drill being a defense artifact is a reference to a glitch in FF6. It’s normally an attack item, but if you tricked the game into letting you equip it as a helmet, it gave you max defenses.)

That’s fascinating, thanks! Never knew that.

A wild video appears! What do? Watch.

[B][URL=“https://www.youtube.com/watch?v=hRSHY4Y7WgY”]Zodi Plays: Final Fantasy Crystal Chronicles [8] A Foreboding Court[/URL][/B]

[B]Video Length: 37:23[/B]

Starting us off this video, we visit Shella, the ancient mysterious Yuke village. You can only enter if you pay them a Mark of Shella, though they sell those inside the city and they’re easy enough to find in the Sluice. Within the confines of the honestly rather beautiful village we find a bunch of Yukes, and get a little more insight into how these weirdos work. There really isn’t much TOO Shella, but important details include the fact that a lot of people here tend to forget things, and there’s a Selkie wizard scientist trying to find a way to create crystal-less travel through the Miasma! That’s pretty exciting, I wonder how he’ll do. After Shella we return to the Jegon River, inadvertently finding a mysterious Selkie woman, and also finding that Knocfelna, the royal guard we talked to last time, hunting after her with his gigantic dog. Nothing that’s really our business, so we take the Jegon Ferry off to the next hub area of the game, the Plains of Fum! In which we find the farming village The Fields of Fum, irrigated by the Jegon and large enough to have three crystals keeping it going! That must be hectic. We explore the village, finding it quaint and nice, impulse buy a cow, and head off for our next destination.

In all honesty, I should of done the Daemon’s Court last, because in style and scope it feels like a “final dungeon” for lack of a better term. It’s only a single room large, but it is a massive fortress full of enemies. This is some of the hardest basic enemy encounters we’ll have in this game, with Giant Lizardmen that can stun us, Lizardmen that carry spears that can stun us, Lizard Wizards that can cast thunder magic which etc etc the point is this is a place were you’ll get stunlocked to death if you’re not careful and I almost do a few times! This place also has Killer Bee’s, which are not a big deal if you have Gravity but oops guess who forgot how to make Gravity it’s me. There’s also Wraiths, horrible ghosts that require you to cast Holy on them before they’re really able to be hurt. They have 20 hp and until you hit them with Holy they only take one damage from any damage source. It sucks. One of the Wraith’s have the Life stone you need to cast Holy on them! There’s also Coeurl’s about, serving as pets to the lizards.

This dungeon has three gimmicks to it. First off, there are catapults. Hit them and they’ll launch rocks once in the direction that they’re facing. They’re really hard to actually use properly, but props for them trying to make something fancy. Second is that there is a Bomb on a log bridge that we cannot cross, that we must cast magic at to kill the bomb on it, and it’s explosion causes the logs to be sent down river. This is apparently supposed to open up some areas in another dungeon, but a buddy of mine has done some testing and can’t actually see any difference. Which is actually kind of a problem this game has. Since it’s a relatively obscure game, not everything is fully documented about it! The third gimmick for this stage is that there are two yellow lizardmen throughout the fort, each holding a key to the boss’s chamber. It’s a neat little bit of gameplay that I kind of like.

Once we’ve unlocked the boss’s chamber, it’s time to fight! The leader of the Lizardmen appears, the Lizardman King! I actually really like his dinosaur-y style design, and his weapons are pretty cool. That pile bunker on his arm can be launched forward as a powerful thrust attack, though it’s easy to dodge. Less easy to dodge is his shield arm attack, which both protects him from damage and spews out a bunch of arrows. The King also has a small little wiggle spin attack if you’re too close to him, which does almost no damage, and is actually really easy to bait him into so uh actually this boss is super easy holy crap. The biggest threat here is the coeurl’s getting in the way, or the occasional Lizardmen soldier coming in to hit the switch that causes the buzzsaw trap to activate, and even then it’s just a minor issue. It can even hurt the boss and other adds too! So yeah overall this isn’t a hard boss at all.

With the lizards routed, we get our Myrrh from the tree they built this “court” around. Another drop for the bucket. Hope you all enjoyed, I’ll see you guys next time.

2 Likes

I’ve really been enjoying this LP so far! Thanks for doing a playthrough of this game. :3: