Ernest Goes To Japan - Let's Play Nioh

Man, I knew I was missing out on something intresting when I quit this game on the second level. The combat just really didn’t click with me and I didn’t find the levels all that interesting. So thanks for playing this so I don’t have to!

1 Like

Isle of Demons and Deep in the Shadows are pretty rough just for what you’re dropped into and what you have. Isle expects some grind and deaths I feel like, while Deep in the Shadows has a hidden third shrine and a fairly lengthy run to the boss from the second. Onryoki gets more complicated when his chains breaks, going from slow and predictable to faster and more aggressive, while Hino-enma in the new player grinder. Fun tips for Hino-enma is she (and most other flying enemies from basic testing, like the oni heads) take increased damage from projectiles while in the air, making shuriken and kunai really good at chunking out her Ki while she’s throwing blasts at you from the sky. I haven’t tried using a bow or a gun on her but I know hand cannons can do some silly work against bosses if you line up the shots quickly enough.

1 Like

Yeah I find Nioh not exactly new user friendly. Something I was hoping with this LP is to show tips to people to help them through the game as well or get them more invested in it. But it’s also cool for people it doesn’t click with to enjoy the game through the LP without playing it.

And I can confirm arrows and bullets work just as well against her. I suggest the bow since it’s faster to use for when you need to dodge her blasts.

Update 10 - The Iga Escape

Ishida Mitsunari’s army is in the way of us. They’ve blocked off our paths to Tokugawa, but Hanzo has a plan. He takes us through a mansion in the Iga territory. Formerly the Iga ninja clan was wiped out by Oda Nobunaga. Surprisingly this isn’t a walk in the park. Edward Kelley has resurrected the Iga ninjas as revenants of evil. William must fight his way through while exorcising the spirits of the dead. At the end he faces a Giant Toad, who is Hattori Hanzo the elder, our Hanzo’s father. Who was known as Demon Hanzo.

Boss Information:

Giant Toad Profile
Giant Toad is a boss that is weak at short range. Try to stick to his backside and back off when he jumps up. When at the front he can swipe and thrust with his spear and deal massive amounts of damage in succession. Just in front of him with his pipe he can smack at close range or spray Yokai realm upon the floor stopping your stamina regeneration. He’s weak to lightning and earth, I suggest lightning as it slows him as well. At long range he can thrust with his spear or use his tongue. Demon Hanzo has a wide variety of ninja tools he can use, such as fire bombs, throwing weapons, and paralysis bombs.

2 Likes

Just thought I’d mention I decided to buy the Nioh DLC so after I beat and practice it I’ll be doing it in the LP as well.

Update 11 - Memories of Death-Lilies

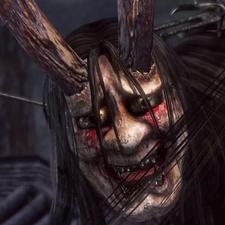
On the way to joining up with Tokugawa Ieyasu around the castle and town of Futamata lilies and Yokai have appeared. Hanzo cannot join us but Okatsu knows the area. Both her and William head to Futamata. After fighting his way through the Yokai, William discovers the source of the lilies. A large weeping Ogress who is in reality Tokugawa Ieyasu’s former wife Lady Tsukiyama.

Boss Information:

Ogress Profile
The Ogress is a very straight forward fight. She telegraphs every move of hers quite a bit allowing you to prepare to dodge early, but don’t do so too early as a lot of her attacks are delayed. Lady Tsukiyam can swipe, she can jump and land down with a slam, and smash her claws into the ground then bring up rocks which deal damage. When she’s low on health and stamina she’ll summon lilies that create Yokai realm around the arena. This will slow your Ki regeneration and hasten hers. A dangerous attack of hers is a flurry but if you hug close to her face it will go right over your head. Sometimes she’ll breath fire which you need to dodge through. Generally hug her butt. She is weak to water and earth.

Characters introduced

Senji Muramasa

Muramasa Profile

1 Like

Fun fact times, there was an Alpha and Beta for Nioh, the Alpha had one stage, Isle of Demons, and Beta had a second stage, Memory of Death Lilies. This is why compared to some levels there’s a whole mess of Amrita Memory in both, though Isle has being the first stage with the meat of the game mechanics. I believe the Beta used the enemy layout of the Twilight Mission version of Death Lilies. Twilight Missions are harder versions of Main Missions, stronger enemies and meaner enemy layout. Each day two will be randomly available, but you can’t do them unless you’ve completed the main mission they’re a remix of.

And a new pal, Gyokuto the lightning bunny! Bringing Elixir Effect on Life Recovery +20%; Dash Speed +10%; Low Attack Damage +8%; Luck(Using Living Weapon) +100; Ninjutsu Power +75

Gyokuto

20% more healing from Elixirs, getting more out of your healing can be useful depending on your Life total and armor of choice. Dash Speed makes you sprint faster, which since you can freely sprint in any direction even while locked on you can use that to reposition quickly, it’s alright. Low Attack Damage is weapon dependant but good (Single Katana low stance is very good so boosting it’s damage generically is pretty good), you get more Luck than Itokori, but only when using a Living Weapon and no boost to droprate so, eh. Ninjutsu power at +75 is pretty big. Living Weapon wise it’s another low might lower damage Living Weapon with good Gauge. Gyokuto’s summon attack is Hi-nezumi’s if it was good, popping out and jumping in a box-like pattern, leaving 7 lightning balls behind. They deal incredibly low damage but incredible Electrify potential, hitting most non-bosses with the status effect in two ticks of damage. Notably the sparks remain even when contacting with an enemy and last a good long while, which pairs well with something like Poison bomb or poison groundfires, or murdering a slowed opponent, or you have bonus damage against Electrified foes. 11/10

2 Likes

I really wish this game bumped a few of these more interesting bosses to the beginning, I think that really would have helped draw new players in.

It’s a bit of a double edged sword though since a lot of the more interesting bosses are harder to fight simply because of their mechanics.

2 Likes

Update 12 - The Defiled Castle


[Content Warning for Human Waste]
We’ve made our way to Ieyasu. Just as things start to look right Edward Kelley strikes again. This time his target is Edo Castle, Ieyasu’s seat of power. It is what functions as his capital and home. William is sent to take the castle back, but must enter through the only way available. The human waste tunnels beneath the castle. He gets really stinky on this filthy adventure and sneaks into the castle while freeing Tokugawa soldiers. Along the way he is stopped by a mind controlledHonda Tadakatsu. Tadakatsu is a tough fight but before long William is back to climbing up the tenshu of the castle. At its very top he finds a familiar face, only Okatsu is under Kelley’s control like many of the other warriors present.

Kelley manages to nearly capture Okatsu before escaping, she gets away from his clutches through her ninja ingenuity. But, it was all just a distraction. While Tokugawa was preoccupied with Edo castle, Ishida Mitsunari raised an army in the west to fight Tokugawa’s army. Tokugawa Ieyasu bleeds from his mouth, a man who has given up everything for peace, including family. With his heavy burden on his shoulders he rallies his own forces and plans to meet Mitsunari in the field of war.

Boss Information

Honda Tadakatsu Boss Profile
Honda Tadakatsu is deceptive in his movements. He walks very slowly and telegraphs his attacks heavily but when they strike they are as swift as a coursing river. His attacks hit incredibly hard and he can heal and has a buff as the crystals are controlling him. For this fight you can lead him away from crystals then break them. When all three are broken he’ll be freed and end the fight. Alternatively you can take him head on. Being a spear user, most of his attacks are thrusts with his two main tactics being a charged lunge attack or a quick series of stabs. Try to stick to his backside and note that he is resistant to earth and weak to wind.

Okatsu Boss Profile
Okatsu is the tougher of the two. She’s incredibly fast. You’ll want to conserve your ki and be ready to dodge at any given moment’s notice. The only breathers you’ll get is if you drain her of her stamina and grapple her or knock her down. In between attacks she’ll throw knives in a spread that are best blocked. At times she’ll sheath her blade then rush forward with a powerful blow. As the fight goes on she’ll get faster and activate her living weapon. Okatsu will leap into the air and when she hovers for a second prepare to dodge as she’ll rocket right at you. Her guard is very weak so you can grapple her from time to time. She resists lightning and is weak to water.

Characters Introduced

Honda Tadakatsu

Honda Tadakatsu Profile

2 Likes

So! Ryunoshin, the Dung Ball guy, is related to an achievement in the game. Give him A dung ball, get a gesture. Give him 15, get a Soulstone, a large amrita item. Give him 30 or so, get his helmet and the achievement, and he’ll open his door for you if you haven’t defeated Tadakatsu. This lets you skip him entirely, making him the only skippable main mission boss.

Boss Stuff

As for Okatsu, she’s a Low Stance boss for sure. Blocking the kunai is easy even in low Axe and the significant dodge Ki reduction in low stance with the better dodging makes her moves less pressuring. Okatsu’s interesting because she uses her Living Weapon works entirely differently than yours and everyone else’s. It doesn’t fall off once applied and doesn’t add to her damage, just opening up more moves she can combo into. Less Living Weapon, more phase change. Either way, the hot strat is she’s human and Mizuchi’s water and knocks humans on their face (for the most part) so River Dragon>Lightning Bunny. I also love Kelly’s reaction at the end, that wasn’t according to plan.

And our new spirit pal! Narikama Tanuki brings Retrieve Lost Amrita 50%; VS Earth +20; Unlimited Elixir +15%; Strong Attack Damage +10%; Auto Life Recovery (Critical)

Narikama Tanuki

Retrieve Lost Amrita means if you die you get a percentage of the amrita stored at your grave. VS Earth exists, moving on. Unlimited Elixir, like unlimited Onmyo and Ninjutsu, gives you a percent chance to not consume a charge an elixir when using one, handy when it procs. Strong Attack Damage good with weapons with good strong attacks. Auto Life Recovery (Critical) gives you a significant HP Regen effect when you’re knocked into Critical health. Importantly it’s not just active while in Critical once activated. It’s about 1.7% of your max HP per tick. Not great by itself, except it (and all other heal over time effects) stack with other sources of it. Still not great past NG.

In terms of Living Weapon Narikama Tanuki’s defensive as all get out, packing better might than Fuse-ushi and a mighty 20 second duration base. Damage wise it’s a respectable 12% and 30 Earth, with it’s only weak stat in Gauge Rate. The Summon Attack is fairly potent, summoning the Spirit who does a few adorable flips in front of you until it contacts with an enemy, dealing a single hit of average damage before disappearing, to suddenly slam down in a giant Yoki sized form that knocks down human sized opponents and deals big damage to large enemies who aren’t knocked down. Notably the giant slam has a good shot at smash Yoki/Amrita Fiends’ horns, flooring them anyway. Slightly awkward to use in close range due to the angle the Tanuki initial comes in at, enemies directly in your face aren’t likely to be hit. Still can call a raccoon dog to do flips and shit 12/10

2 Likes

Great info like always! I have finally gotten around to adding links to your posts beneath the update section since your posts are so informative and I feel are a great addition to the LP.

Update 13 - Immortal Flame


Torii Mototada is sacrificing himself at Fushimi Castle. While the Western Army spends eleven days attacking the castle buying time for Tokugawa Ieyasu. William has decided to go to aid Mototada. His last stand need not happen, and we fight our way through the forces of Ishida Mitsunari and the Saika Ikki. Edward Kelley’s Yoki creations are mixed in with the enemy. William manages to make it to the keep while the castle burns. With fire all around him the castle begins to crumble. Before he can reach Torii Mototada he is stopped by Saiki Magoichi. Their duel in the blazing inferno ends with William the victor and the Saika retreat. Sir Anjin reaches Mototada who goes on to fight till the end, ordering William to escape via a secret tunnel. His brave sacrifice ends up allowing Tokugawa Ieyasu to muster his forces and ready the Eastern Army for a major battle to come.

Boss Information:

Saika Magoichi Boss Profile
Saika Magoichi can be a tough fight depending on your build. High ki regeneration is advised for this fight. Whenever you see him about to fire get ready to block or dodge, blocking his bullets is easy enough. When he throws fire bombs he will throw one or three< be wary of just dodging to the side, and instead try to dodge towards him. Rarely he’ll engage in melee with a few quick hits that deal low damage. When he whistles he’ll summon his Guardian Spirit to send out gusts of wind to where he is facing. Go to the sides to avoid this. When in the air he is very susceptible to ranged attacks and can be easily knocked down then hit while he’s on the ground. Up in the air he can swoop and grab William then throw him to the ground. He is resistant to fire so he takes little damage from the fire in the room. Saika Magoichi is weak to lightning and earth, so I suggest bringing the appropriate Guardian Spirit to be his elemental weakness.

Characters Introduced

Saika Magoichi

Saika Magoichi Profile

3 Likes

Aw yiss time to talk about the best boy, the Vermillion Bird of the South, Suzaku brings Activate Living Weapon (No Life), VS Fire +20, Amrita Earned Using Living Weapon +25%, Fire Damage +15%, Auto-Charge Amrita Gauge (Critical)

Suzaku

Immediately Suzaku gets to the point, Activate Living Weapon (No Life) means if you have a full Amrita Gauge and take lethal damage you will be left with 1 Life and Living Weapon activates. This skips the animation and it’s iframes but this gives you an entire second health bar and hyper armor, and you can use items like Elixir in Living Weapon. This can save you from death and turn around bad situations. VS Element still exists. Amrita Earned Using Living Weapon is self explanatory but as a reminder, gaining Amrita during living weapon extends the duration, based on the amount gained. Suzaku also packs best Recovery, meaning with this you can sustain Suzaku’s living weapon for a long freaking time. Bonus fire damage works great with a Fire spirit, and Auto-Charge Amrita Gauge (Critical) slowly charges your Amrita Gauge while you’re Critical. It’d not the best since Suzaku’s Gauge rate is quite poor.

Importantly however is Suzaku packs 15% damage boost and 50 Fire, decent Might, Best Recovery and Tenacity, and okay Action. The base duration of Suzaku is a little low and the aforementioned worst Gauge Rate balances the fact that the Vermillion Bird will keep you from dying and then put you in a solid offensive Living Weapon to scorch your enemies away. Suzaku’s summon attack is incredibly good, the rather large spirit swoops down, slowly circling around you until reaching the front of you (from where you cast) before flying up and bombing into the center of the circle path it flew, causing a burst of fire. Contact with the spirit does good damage and knocks hit foes back base on what part of Suzaku hits them. If lined up just right they’ll get shoved in front of Suzaku, who will hit them again, shoving them in front of Suzaku again, repeating until finally they’re released from the strafing run just in time to get dive bombed. This deals potent fire damage with the boost and while the contact hits don’t build the status effect quickly the final burst heavily inflicts it meaning one contact and the final burst will scorch most foes on NG. The full loop can shred Fire Weak enemies Life quickly and have I mentioned that you get to cheat death on top of having this incredibly good summon attack? 14/10

As for Kelly’s yoki, if you look close the red runes closely match what Kelly has going on. Not one to one but same style, on top of using those red amrita spikes Kelly shoved into Derrick way back in London to make him grow. The important thing to note about the red amrita spikes is that they can be used as a ranged attack or a close range grab, and if it hits a wall or the ground, will explode a few seconds later. Even more importantly, they cause Discord build up by themselves, later one inflicting the effect with a single hit. Don’t let that happen.

2 Likes

Update 14 - Sekigahara


The battle of Sekigahara is underway! Both the Eastern Army and Western Army have clashed in Mino just outside of Gifu castle at Sekigahara. The Eastern Army, led by Tokugawa Ieyasu, struggles to make way during the battle. At first it would seem Ishida Mitsunari’s Western Army is in the advantaged position until Kobayakawa Hideaki betrays him and turns his forces on the Western Army. Seeing no other option, Otani Yoshitsugu turns to the Amrita and turns himself into a Yokai, and begins to slaughter all that attack him. Originally uninterested in joining the battle, William rushes off at the news of Yokai hoping to find Edward Kelley.

After defeating the Justice Minister Yoshitsugu, William continues to fight his way across the field to find Kelley. Seeing the battle as lost, Shima Sakon goes off to hold the Eastern Army back while Mitsunari retreats. All who approach him are slaughtered by the great samurai, until William arrives. Both enter a gruelling duel, afterwards Shima Sakon offers William his spear and William spares his life. With the battle almost over things look good for the Eastern Army until Edward Kelley unleashes a powerful spell raising the dead, summoning Yokai, and a great demon that threatens the world is formed.

Boss Information:

Otani Yoshitsugu Boss Profile
Otani Yoshitsugu is fairly easy as far as bosses go. He focuses mainly on combos that have a poor turning radius allowing him to be easily sidestepped. When his Living Weapon activates he’s a bit dangerous. He can fire waves with his sword swings and do a spinning vertical slash from overhead that should be dodged instead of blocked. If he enters a superman flying pose get ready to dodge as he’ll zip through the air towards you, often doing it twice in a row. Weak to fire, resistant to water, Yoshitsugu presents little of a threat.

Shima Sakon Boss Profile
Of the two bosses in Sekigahara, Shima Sakon is definitely the tougher. He is quick moving with slow wind ups. His grapples and push attacks are very fast but either do no damage or little damage. Shima Sakon likes to control where you are. Watch out for his Living Weapon, as it is lightning and if you take a few hits you’ll get slowed down. If he leaps up into the air try to move as far away as possible. Don’t block his slam or his lightning explosions. Shima Sakon eats through stamina quickly but has a high guard. He is a decent target for grapple attacks.

1 Like

So our new spirit to start! Kara-jishi packs Increase Attack (Skill); Guard Ki Reduction -20%; Lightning Damage +12%; Ki +20; Skill Life Drain 15.

Kara-jishi

Hoo boy Kara-jishi, a contender for “Best Offensive Spirit” alongside Kato and one other we’ll see later. Increase Attack (Skill) hands you a damage boost whenever you deal damage with a Skill. It lasts a decent chunk of time, 5-7 seconds, and iirc stacks with consumables like Power Pill. Guard Ki Reduction is still a great defensive trait and unlike Fuse-ushi, Kara-jishi doesn’t really have situational passives like VS Poison and Recurrent Damage from Poison -25%. Lightning Damage +12% is lower bonus than other Spirits but still quite good. Ki +20 remains solid, especially paired with the Guard Reduction. Skill Life Drain heals you based on the amount of damage you deal with Skills, gives some sustain while slamming out Skills for that damage boost. Lighting Lion’s passives aren’t playing around.

So with an excellent passive line up the Living Weapon has to be kinda mediocre, right? Well, up front Kara-jishi has 22% damage and 42 Lightning, good Might, and a 18.8 second duration baseline. The other stats run into problems though, bad Gauge Rate and worst Recovery means you aren’t getting much extra time in Living Weapon and with average Action it’s comparatively short compared to the other usual Living Weapon-centric Spirits. But if your weapon has skills it can use in Living Weapon you have the Attack boost on top of everything. Really Kara-jishi’s weakness is having a bad summon attack, maybe worse than Kato’s used properly. The spirit lands in front of you, charges a moment, then lets out a beam of lightning directly in front of it for two seconds or so. The problem is how long it takes, against anything remotely aggressive it’s not hitting at all and the contact damage from Kara-jishi landing barely exists. It at least deals purely lightning damage with the beam fairly quickly if you somehow line it up. 13/10

And here’s some chat about the bosses featured in the video.

Boss Facts

Now that we’ve seen not one but two bosses who Living Weapon, let’s talk about how enemy Living Weapons work. Rather than entirely replace both Life and Ki, enemy Living Weapons replace the enemy’s Ki. Yokai LW animations drop a Yokai Realm while Human LW animations give them Hyper Armor that even canned animations like Body Flip or Spear Trip won’t interrupt, while also doing an area of damage that can stagger you. Importantly while the Living Weapon is ongoing, Human enemies cannot gain Ki and Yokai enemies don’t generate Yokai Realms (though they can still regain Ki from remaining pools.) This is important because when they run out of Ki their Living Weapon ends. There’s an exception to this but that boss is full of exceptions. So the big thing is just like you, human enemies get Super Armor in LW and the AI knows it and you can’t just trade blows like they can. If you can get them blocking you can unleash Skills like Spear Shove on them and rip chunks out of their Ki but strong attacks are the go to for smashing them out of the Living Weapon.

Yoshitsugu’s here is slightly unique because, it’s not elemental at all, similar to Kelly’s Yoki, but without the Discord and the red color. I think this shows Yoshitsugu’s magical stuff isn’t the same as Kelly’s, and likely Kelly came to him to offer his services to Ishida rather than to deal with his leprosy, which I feel is reinforced by no additional things being involved in Yoshitsugu’s transformation, other than him resolving to when the Western Army is betrayed by Hideaki.

Shima Sakon’s Living Weapon is fairly rough but that giant leap he does costs a ton of Ki and generally leaves him out of Ki so a quick bow or kunai can knock him down for a Grapple. The big thing is don’t retreat, as Kara-jishi’s summon can zone you out and get you laid up between him and it’s beam. And on top of his Grapple he’s also packing Spear Shove and Trip, so dodging is generally a better choice than blocking anyway.

1 Like

Update 15 - The Source of Evil


Edward Kelley has unleashed a spell turning the massive amounts of dead bodies at Sekigahara into Yokai. At the very center has spawned a giant skeleton known as a Gasha-dokuro. It threatens the whole of Japan with its might, as such William has no other choice but to fight it. Both Tenkai and Hattori Hanzo assist him in the battle. Hanzo far off fires cannons at the monster distracting it while Tenkai gives William a crystal that allows him to turn the large spirit stones around the battlefield from negative energy to positive. After altering the stones he leaPs down to fight the Gasha-dokuro. It is a terrible battle as William narrowly avoids death against the great Yokai. Tenkai assists him by pinning the Gasha-dokuro at times allowing WIlliam to attack it. When the fight ends Tenkai casts a spell banishing it, in all of the commotion Ishida Mitsunari and Edward Kelley have escaped. William chases after them though he deals with the retreating Shimazu first.

Boss Information:
Gasha-Dokuro Profile
The Gasha-dokuro is more of a puzzle than a straight up fight. You need to damage its limbs to allow Tenkai to pin the Gasha-dokuro. When you see purple/pink beams hitting the boss run up the slopes and get ready to hit its head. Manage your stamina well and if you have your Living Weapon ready pop it early right before the skeleton’s head slams onto the raised ground. Each time you break a limb you’ll have an opportunity to do this. In between the boss will slam its tail, feet, and hands wherever you happen to be. In general dodge towards the boss to escape being crushed. After being pinned the Gasha-dokuro will clap its hands at the top of the slope, make sure to drop down before it does this or you’ll be one-shot. This boss is weak to all elemental types and resists poison and paralysis.

2 Likes

Update 16 - A Defiled Holy Mountain


Ishida Mitsunari and Kelley have retreated to Mount Ibuki. On this holy mountain their forces are making a last ditch effort defense to protect their leader. While the Eastern Army focuses on Sawayama Castle William chases after where Mitsunari and Kelley truly are. Alone, he ascends the mountain on the hunt. Fighting his way through the Ishida forces, at the summit of Ibuki he discovers Mitsunari. There Kelley stabs a spike into him from behind transforming him into a Yokai similar to Derrick the Executioner. Both William and Mitsunari duel with William coming out the victor. Tenkai arrives and with holy water manages to save Mitsunari while purging him of the negative energy. Here it is revealed that Tenkai was secretly Akechi Mitsuhide all along. Kelley was supposed to resurrect Toyotomi Hideyoshi for Mitsunari, only in truth he plans to resurrect the Demon of Owari himself, Oda Nobunaga.

Boss Information:

Ishida Mitsunari boss Profile
Ishida Mitsunari is a boss that contains a very quick fight. He is fast himself but also has low health all things considered. Mitsunari is weak to lightning, resists wind, paralysis, and poison. His speed is his greatest advantage in the fight. Watch out for his quick attacks and try to circle around him mid combos. He doesn’t have a good turning radius and leaves himself open from behind. From time to time he’ll swing his sword and fire projectile waves from it, these can be dodged through or blocked. Blocking them is the worse option as they deal raw wind damage which will go through your guard. Try to keep near the top or bottom of the slope in the arena. At times he will charge up a flurry of wave attacks in all directions, these can be dodged or using the elevation difference they can merely go above or below you. When he leaps back up in the air dodge immediately as he’s going to swoop at you with a grapple attack. If he runs out of stamina feel free to dump damage on him but understand he will only be staggered for a bit before reactivating his Living Weapon. Almost the entire fight he will have it active.

Characters Introduced

Akechi Mitsuhide

Akechi Mitsuhide Profile

3 Likes

Update 17 - The Samurai from Sawayama


Sawayama Castle is under siege by Hideaki and Naomasa. As both armies fight against the remaining Ishida forces they have discovered a large number of Yokai within the castle. They call upon William for help, he is all too willing to go. Edward Kelley is believed to be in the castle working to resurrect lord Oda Nobunaga. William Adam ascends and descends then ascends again through the castle. Ultimately he finds Kelley only to be stopped by his bodyguard, the Obsidian Samurai, Yasuke. Yasuke puts up a good fight but he’s no match for William. After being defeated he relents about the death of Nobunaga and his place in the world. Edward Kelley manages to escape with Nobunaga’s body, leaving William to yet again chase after him for their final confrontation.

Boss Information:

Obsidian Samurai Profile
Yasuke is a very simple fight. He uses an axe and a katana. When he has his axe out he is slower, even with his katana he is a bit slow. Circle around him when dodging and hit him from behind. You can repeat much of the tactics used on Honda. The Obsidian Samurai is weak to water and resists lightning, paralysis, and poison. Sometimes he will raise his weapon and buff himself. Rather than using a Living Weapon he’ll do a high leap and slam down with an electrical explosion. Fall back when you see him leap high. If he does a short jump instead he’ll be left wide open after. This fight is again, fairly easy. If you lose sloth it isn’t even a fight anymore he’ll just be a sitting duck.

Characters Introduced

Yasuke

Yasuke Profile

Reference for information in the vid

2 Likes

I believe the second group of humans at play on Mount Ibuki are bandits, based on the amrita memory near the start and their armor. Also finally on screen Sloth, Sloth is good and breaks the back half of NG right over your knee and doesn’t let it back up until Way of the Strong or NG+. Importantly all three DLCs are balanced to be one difficulty higher than the base game, so Way of the Samurai (NG) DLCs run the spectrum of Way of the Strong’s difficulty, and with this comes every boss having dramatically higher Sloth resist.
I’m also behind on Spirits so lets dig in, starting with Yatagarasu.

It exists. Moving on! Slightly more seriously it brings Unlimited Ammo 10%, VS Wind +20, Long Range Attack Damage +10%, Sense Enemies, Life Recovery From Hit (Ranged Weapon) 30.

Yatagarasu

Don’t use this spirit. The passives make sniping slightly better with a chance to not use ammo and the life recovery is super low. While it’s unique what it’s doing just isn’t really that good. It’s Living Weapon is fine, 12% and 30 Wind with good Gauge Rate and Recovery, and it’s summon attack is difficult to line up. The Guardian swoops in front of you a fair distance and rises above the first target it hits. After a short delay it lets out two blasts of wind to either side of where the enemy was when it was hit by Yatagarasu. Contact damage is low and the blasts don’t do much more damage but inflict Bluster at a heightened rate. Even being a three eyed crow doesn’t save Yatagarasu. 10/10

Izuna brings Earn Amrita (Strong Attack) 25, Amrita Earned 8%, Close Combat Attack Ki Reduction 10%, Wind Damage +15%, Auto Life Recovery (Finished Using A Living Weapon)

Izuna

Izuna has a plan and that plan is build up Living Weapon with Strong Attacks and then Living Weapon to leverage that Wind Damage. A decent plan, offset a bit by the worst Gauge Rate and average recovery, but with 21 seconds duration baseline and best Action you can stay in a while to get that 42 Wind damage bonus. The 5% damage boost keeps Izuna from riding among the greats but it’s summon is interesting in that three versions of Izuna spiral out forward in random directions (forward and up is possible, making it a really weird and random angle) but at close range all three can hit a foe and after going forward a fair distance each spirit shoots up, knocking down foes they contact with during this time. Against bigger foes this is a lot of stagger and Bluster. 12/10

Atlas Bear brings Increase Damage (Low Ki), Life Recovery By Grapple 150, VS Lightning +20, Close Combat Damage +10%, and Shorten Recovery Time (Out of Ki)

Atlas Bear

Increase Damage (Low Ki) gives you a damage boost based on how low you ki is. It first kicks on a small boost at about half your Ki and maxes out below 15%, which if you’re using an Axe and its skills will be Often and Always. Since one of the Axes Mystic Arts dramatically increases the damage of attacks that reduce your Ki to 0 or less, this can do some damage. Life Recovery on Grapple is fine, getting healed for doing something you already want to do is ok. VS Element exists, at least Lightning is the worst element to face. Close Combat Damage is great since it’s ALL melee damage, and Out of Ki is the state your put into when your Ki is reduced to 0 or less by an enemy attack. With the shortened recovery time you come out of the state at 30% Ki instead of 50%. With A agility this basically makes you immune to Grapple attacks since you can recover and roll before the animation comes out, and with anything less this makes it easier to get out at the last second. While it’s better to not be in that position, if you’re keeping your Ki low to leverage the passives it’s a nice cover.

In terms of Living Weapon Atlas Bear is another of the big heavy bruiser types, packing 23% damage and 42 Lightning. What keeps it different from Kara-jishi is better Gauge Rate and Recovery though it’s action is noticeably worse. It’s summon attack has the bear appear in front of you, raise it’s paw and then smash it down. Anything hit by the smash takes BIG damage and if human is knocked to the ground for a Final Blow. Tricky to time but it’s Daiba-Washi with a BIG hit attached if you line it up. Give this good bear some honey. 12/10

2 Likes