Thanks for the advice, everyone. I’ll talk to my potential co-commentators about getting stuff set up and see what might work best for them.
I am a PRO LP MAKER already because I just found out FRAPS didn’t even take any of the screenshots or videos I thought I took for the To the Moon LP I’m trying to make. So yes, technical issues already. It doesn’t appear to be picking up that To the Moon is a game as I can’t get the FPS Overlay to even display in the game screen to show that FRAPS is running in it. I’ve tried closing FRAPS and reopening it with To the Moon running to see if it picks it up (maybe starting it first was the problem?) No dice. I can’t do this LP without screenshots or video and I have a purchased copy of FRAPS and okay… how do I make it acknowledge To the Moon and start doing its job?
(I’m gonna have to start all over again to get all the screenshots and videos I thought I took…)

Ah… oh dear… ::searches for another screenshot and video capturing program that will work::
I’d say give Hypercam2 or even OBS a shot (It might capture upsidedown I dunno if that’s fixed or not.). It’s not as bad as it used to be and I’m sure it’ll have no problem picking up an RPG maker game. @Jenner
I don’t want to do a straight VLP of To the Moon, I think that would be bad. A hybrid VLP/SSLP would probably be best. Which means I’ll need a way to take screenshots. I don’t think OBS or Hypercam does screenshots AFAIK.
Well I mean, you could shoot it all in video then feed the video file to something like virtualdub and grab the screenshots you want and batch export them out as images. (Though to make the process easier I would go with Hypercam since it outputs to .avi)
Looks like that’s what I’m gonna have to do. Alright, here we go. I’m sure I’ll be back. Thanks for the help. (Stupid FRAPS and stupid me.)
Hypercam is recording the video really tiny, even though I’ve set it to record the full screen and am running the game full screen. Also the music is insanely distorted… Sigh, If only FRAPS would record it, I understand FRAPS. Looking stuff up now.
Alright, so the reason your recording is small is due to way RPG maker games fill your screen. From my experiences with them, they don’t scale the actually resolution of the picture to your monitor’s resolution. Instead it stays at its native resolution, which shot in the dark, is like 640x480 based on your video? I would first google to see if there’s a way to scale up the in-game resolution. If not, you might just have to play the game windowed by hitting Alt+enter, but the screen will be tiny; and you can upscale it in virtualdub to 1280x960 using the resize filter and setting the ‘filter mode’ to ‘nearest neighbor’. That way your pixels will still be sharp and crisp. Then finally use the Save as avi button in the file menu to export your new raw footage. Also I recommend you set the compression (ctrl+P) to Lagarith. (And if you don’t already have this codec, I recommend you grab this to save you from exporting a 200 gig file by accident)
If you’re not down with playing in a tiny screen. you could take the video you shot, feed to virtualdub use the resize filter like I mentioned above and hit the cropping button found here:
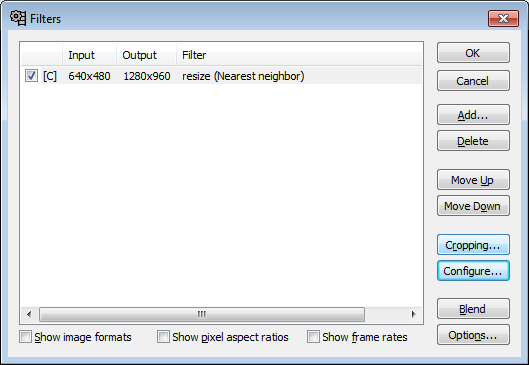
To crop out the black area.
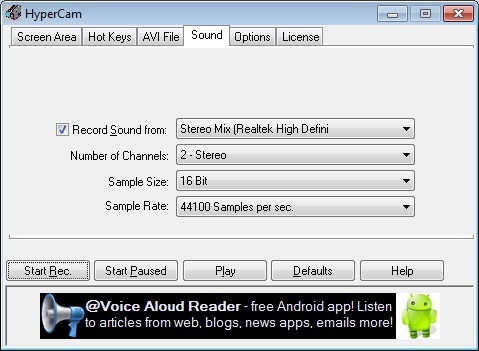
As for your audio, can you screenshot your Sound tab in Hypercam? (ctrl+alt+Print screen > open paint> paste> save) Maybe the sample size or sample rate are set low. But if that’s not the case you might have to use another recorder.
The sound on my computer just suddenly stopped working… So, this is what LPers mean when they say the moment they start trying to LP their computer just starts exploding. I’ve tried using sound properties and such to put it back one but it’s just gone. I’m gonna restart, try recording video and audio in OBS and if not use one of the other programs listed in the tech support thread… This assumes my sound will come back on. But wow, it’s my first LP and already everything is just coming apart and I haven’t even made an update yet. I’m an expert!
Just one of the many humps you have to overcome to make LPs. Anyways I do own To the Moon, so I can install and play around with it and see if I can better help you
Well, the good news (or bad news) is I managed to capture video with Hypercam, and it turned out fine on my end.
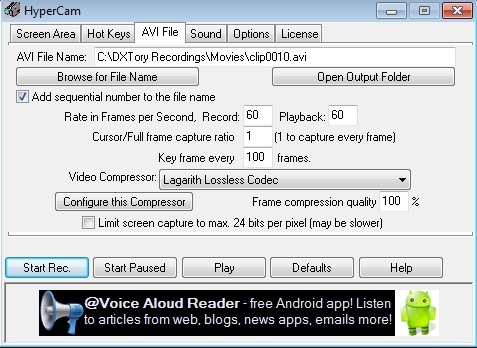
Here’s the settings I currently have Hypercam set to if it helps. (Assuming your audio fixes itself)
Wow! You even captured the window at a decent size! How? What’s your screen area set to? OBS recording is doing some amazing stuff that I’ll probably show off for fun soon.
I just hit Alt+enter to pull out of fullscreen mode, and played and recorded it in 640x480. Then I resized it to 1280x960 using virtualdub’s resize filter.
1 Like
You just helped make a (possibly) great thing happen. Thank you so much.
Wait I need a bit more help. It displays a red box which is where the recording happens, but I cannot appear to adjust the capture area and when I move the window into the capture area it records the header too…
Holy shit, Hypercam 2 just disappeared off my taskbar and shut itself down but the red capture box remains. I tried restarting it, nothing. This is magical. Hahaha.
Hahaha, it keeps crashing and keeping the recording box open. :eyepop:
looks like 648x508 is capturing the whole window including the window title as well but FUCK IT. SO PROFESSIONAL, LOOK OUT CHIPCHEEZUM.
The video plays super fast while the sound doesn’t keep up. Gonna try turning the FPS down to 30…
Is there a guide out there somewhere on how to start/configure a private streaming server? I don’t do a whole lot with streaming right now but that’s on my list of cool long-term projects I want to do eventually.
There isn’t, really. I managed to make it happen by scraping together a few different resources and using someone else’s stream viewing page code for the user interface. I can gather some links and write a half-assed how-to once I get to an actual computer, if you like.
1 Like
Yeah sure. I kind of had the feeling this is relatively unexplored territory and I’ll have to do some digging/work on my own, but every little bit helps.
I think a proper guide write-up would help a lot of people on the forums.
Get you a server
So, first and foremost, get yourself a VPS or some other form of hosted Linux server with shell access. I use DigitalOcean, at their bottom-most tier. ($5/month for 20gb of disk and 2 TB of transfer) This has proved to be enough for me to run a personal web server, multiple Discord bots and the sidestream server.
RTMP servers and you!
The first thing I stumbled upon in my search was on the OBS forums: A great write-up, but I already had nginx installed for web purposes, and reconfiguring it would be a pain in the ass. Thankfully, in the comments, someone mentioned that they made a Docker container just for the RTMP re-streaming portion of nginx. The commenter linked to his GitHub repository which has instructions on how to add the container to your server. (DigitalOcean has a great How-To for installing Docker in Ubuntu (which works for Debian as well) here). I highly recommend using the example that lets you have an external nginx config, as it lets you add people to the stream server very easily. All that would be in the config would be:
worker_processes 1;

events {}

rtmp {
    server {
        listen 1935;

            application streamer1 {
                    live on;
                    record off;
            }
     }
}
Add more Application blocks for different users.
Viewing this mess
So now that you have the server up and running, you need to give people a way of seeing the stream. One way is to use VLC, as it can connect directly to RTMP streams. But since not everyone will have VLC installed, a webpage is great to have as a way to view the stream. Flowplayer is best for this, but sadly you are stuck with the Flash-based plugin, as there is currently no way to view an RTMP stream with the HTML5 player. You don’t need to actually install Flowplayer on your server, you can just call it from their website. Here is the HTML I used to get the webpage working:
<!DOCTYPE html>
<html xmlns="http://www.w3.org/1999/xhtml">
<head>
  <meta http-equiv="Content-Type" content="text/html; charset=utf-8" />
  <title>Sidestream Test</title>
  <script type="text/javascript" src="http://ajax.googleapis.com/ajax/libs/jquery/1.7/jquery.js"></script>
  <script type="text/javascript" src="http://cdn.jquerytools.org/1.2.6/all/jquery.tools.min.js"></script>
  <script type="text/javascript" src="http://releases.flowplayer.org/js/flowplayer-3.2.13.min.js"></script>
  <script type="text/javascript">
    function get_key(){
      var re = /^\?id=([^&]*)/;
      if(re.test(location.search)) return location.search.replace(re, '$1');
      return "nokey";
    }
  </script>
<link rel="shortcut icon" href="favicon.ico" />
</head>

<body bgcolor=#222222>
<center>
<div style="width:1280px;height:720px;" align="center" id="player1">

</div>
</center>
<script>
  flowplayer("player1", "http://releases.flowplayer.org/swf/flowplayer-3.2.18.swf", {
    clip: {
      url: '1',
      live: 'true',
      bufferLength: 0,
      bufferTime: 0,
      autoPlay: false,
      provider: 'rtmp'
    },

plugins: {

controls:  {
            backgroundGradient: 'none',
            backgroundColor: 'transparent',
            all:false,
            mute: true,
            volume: true,
            height:30
        },

       rtmp: {
        url: 'flowplayer.rtmp-3.2.13.swf',
        netConnectionUrl: 'rtmp://YOUR.URL:1935/'+get_key()
    },
}
});</script>

</body>
</html>
The important things to notice there are:
In the HTML Header there is a javascript function called get_key(). This will get a URLPARM that you specify to denote different streams. Eg: http://your.url/?id=streamer1
This allows you to have multiple people using your stream server at the same time.
A little further down in the HTML there is the Flowplayer definition. where it says url: '1' you are setting which stream under the user to view. We will touch more on this when we get to the “Stream to the server” section.
The last really important thing to note is under the rtmp: { block: Where it says netConnectionUrl: 'rtmp://YOUR.URL:1935/'+get_key()
This is adds the URLPARM that we extracted earlier into the stream URL.
So that is pretty much it for the web viewer set-up. Oh, and if you do want to view the stream in VLC, the network URL to use would be http://YOUR.URL/streamer1/1
Let’s Stream to the server
So all that is left is to configure OBS/whatever your streaming system of choice is to use the sidestream server. This is pretty simple… all you need to do is set the Server URL to: http://YOUR.URL/streamer1 and the Server Key to 1.
Here is where you can have some fun, though… If you wanted to do a multistream project, like a race, you can hand out your Server URL to the participants, and give them each individual Server Keys. It could be letters, numbers, words, whatever. Then, in OBS, you can add Media Sources with the stream URL of the racers. This is the same URL as VLC uses, just change the 1 at the end to the letter/number/word you gave the participant. Do this for all participants and boom! You are off to the races! please forgive the pun, I couldn’t help myself
So that’s about it for setting up a sidestream server… your mileage may vary. Using the nginx docker container is an extremely fast way of getting the server up and running, and the webpage shouldn’t take too long to bang out. I have 8 people configured on my server, and most of them use it regularly and I am still safely below my monthly quota that I can pursue other strange projects on my droplet. The latency is about 2 seconds, since there is no transcoding happening on the server. This seems to be true no matter how many people are viewing or streaming.
Let me know via reply or PM if you have any questions/concerns/improvements!
4 Likes